Paper Sculpture Inspired by a Blank Canvas and It's Endless Possibilities
The inspiration behind “Let the Fun Begin” came from reflecting on that unique moment when an artist stands before a blank, white canvas—a clean slate full of potential. It is a space of endless choices and creative freedom, where nothing has been decided and everything is possible.
“Let the Fun Begin” delves into the quiet anticipation and limitless possibility an artist feels when faced with a fresh canvas. This compact work measures just 4.5" by 3.5" framed, yet it carries an expansive narrative, rendered entirely through the delicate interplay of white paper sculpted onto a vivid watercolor background.
The artwork is a three-dimensional paper sculpture that meticulously depicts a painter’s workspace. You’ll find a carefully arranged palette with circular wells, paint tubes scattered in casual disarray, and a brush—and a pencil—all crafted with precision from acid-free white paper and adhered onto a textured surface. The monochromatic white palette emphasizes form and shadow, turning the familiar tools of the artist into an abstract study of shape and volume. This white relief is set against a bright and dynamic backdrop of blues and teals, creating a sharp contrast that heightens the sense of depth and dimension.
The inspiration behind “Let the Fun Begin” came from reflecting on that unique moment when an artist stands before a blank, white canvas—a clean slate full of potential. It is a space of endless choices and creative freedom, where nothing has been decided and everything is possible. I wanted to express that quiet suspense and the exhilaration of beginning something entirely new. The title itself hints at this transition: the “white play” represents the pristine canvas, and the “begin” points to the spark of action, the moment when ideas spring to life.
What distinguishes this piece is its incorporation of sculptural elements purely through paper and paint, blending two-dimensional and three-dimensional art forms. The tactile nature of the paper gives the tools and palette a physical presence, inviting the viewer to consider the act of creation from a fresh perspective—not just as a visual image but as an object to be explored in light and shadow.
Through “Let the Fun Begin”, I invite viewers to pause and consider the magic of beginnings—the blank pages, fresh canvases, and untouched surfaces we all encounter at the start of creative ventures. This work honors that initial quiet moment, where potential hangs in the air, waiting to be transformed into something beautiful. It’s a celebration of the threshold before creation, when the real adventure starts.
This paper sculpture is at Seaside Art Gallery and is available for purchase online or in person at the gallery in Nags Head, NC.

Fun Leaf Collecting Activity for Kids — Great Reference for Artists
Looking for a fun activity that you can do with your children or grandchildren? You can enjoy an afternoon discovering nature and help them with their writing and researching skills!
Looking for a fun activity that you can do with your children or grandchildren? You can enjoy an afternoon discovering nature and help them with their writing and researching skills! Of course, there will have to be some art involved too.
When I was researching and planning out my next 3D paper sculpture, I started to gather up my reference materials. As soon as I pulled out my old scrapbook, it brought back a lot of fun memories.
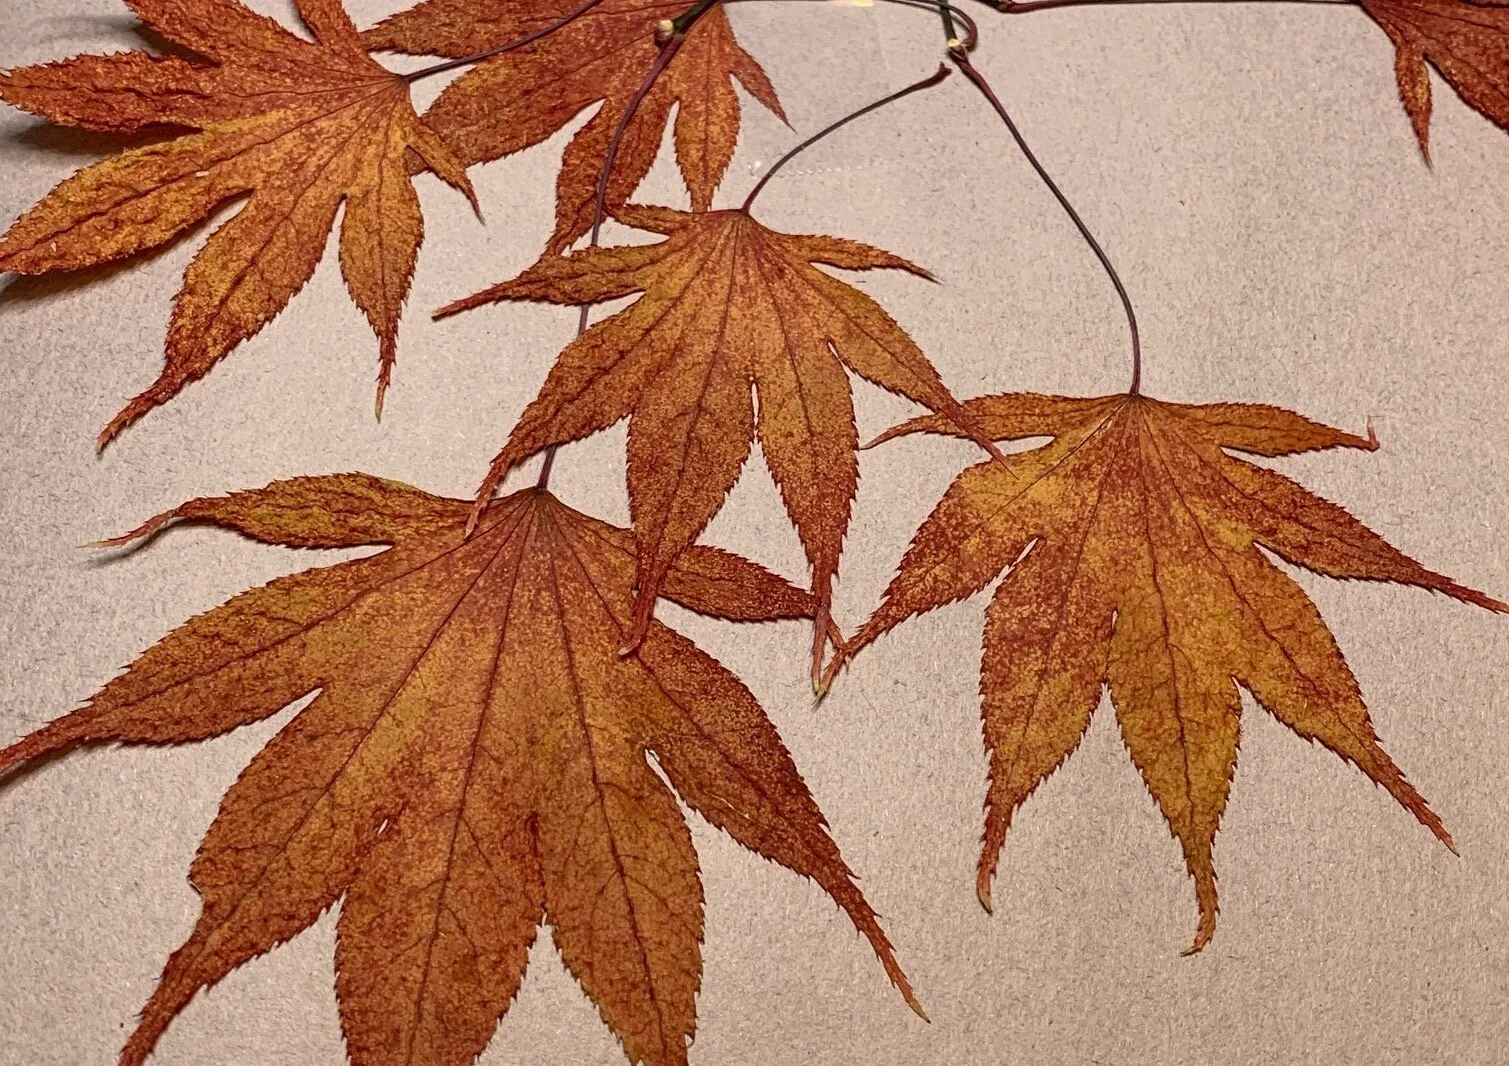
When my children were young, we enjoyed collecting leaves and acorns that were plentiful in our backyard. We would comment about the shape and the colors of the leaves. We especially enjoyed looking for leaves in the fall season — trying to find the best leaf possible. Sometimes the kids would hunt for the most colorful red, yellow or orange leaf, and another time they would hunt for who could find the largest or the smallest leaf.
When we would go back in the house, I would get out the scrapbook and my many tree and leaf reference books. My children would flip through the pages of the books to identify which leaf they found. We had quite a few different types of oak trees and maple trees to identify. Along with sassafras, sourwood and even a big tulip leaf. I can’t believe how big those leaves grow – it takes up almost the entire page in the scrapbook.
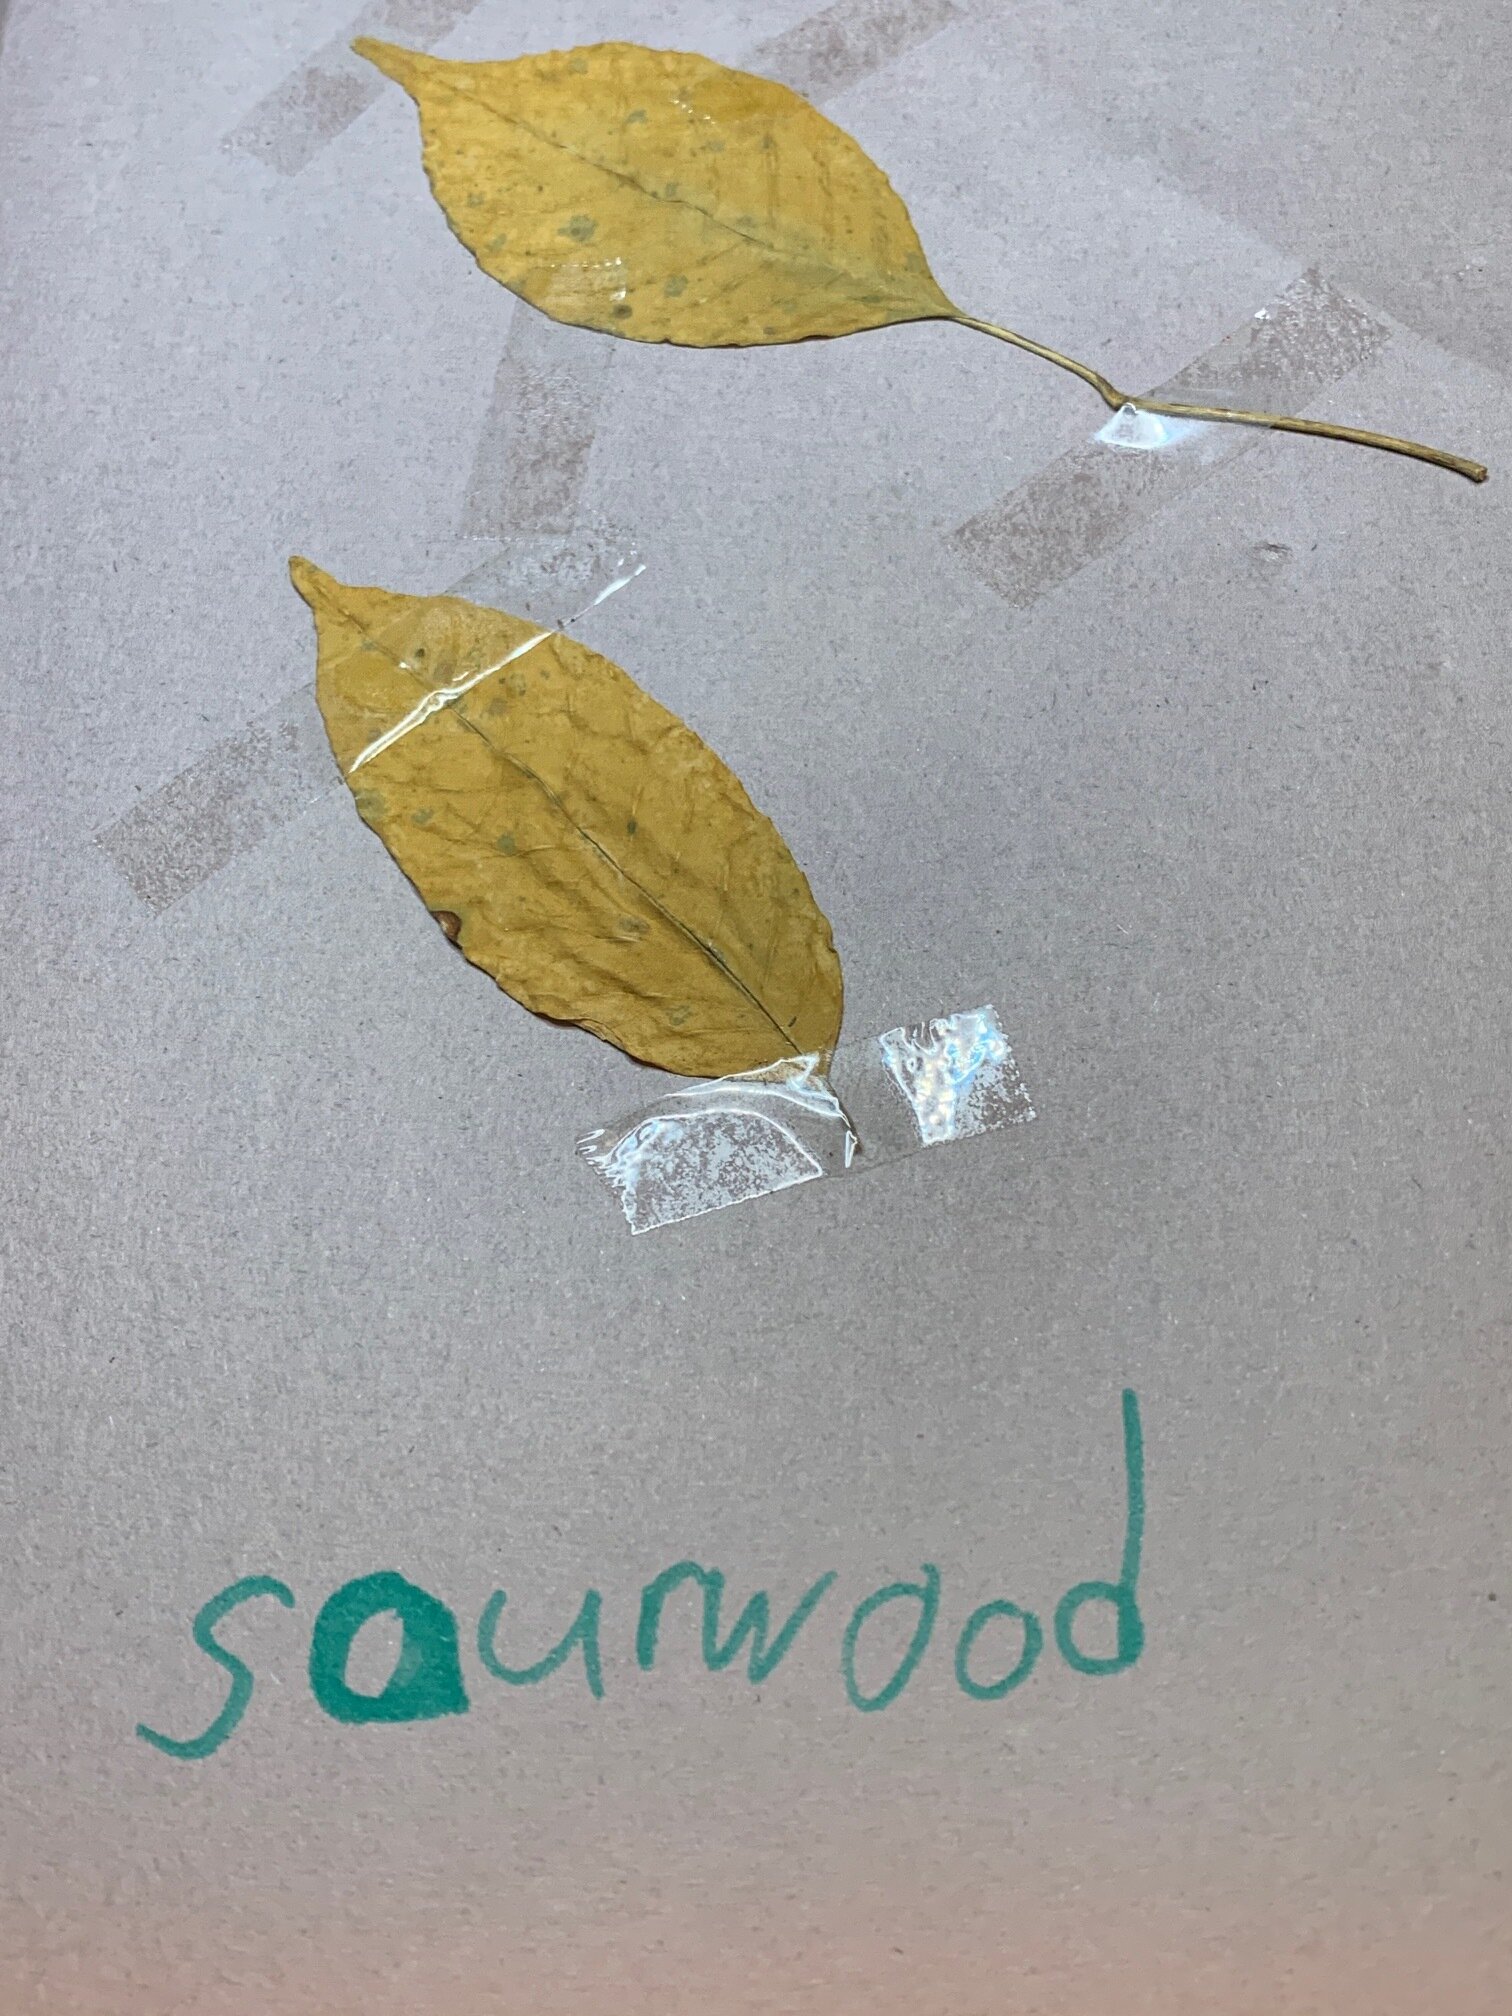

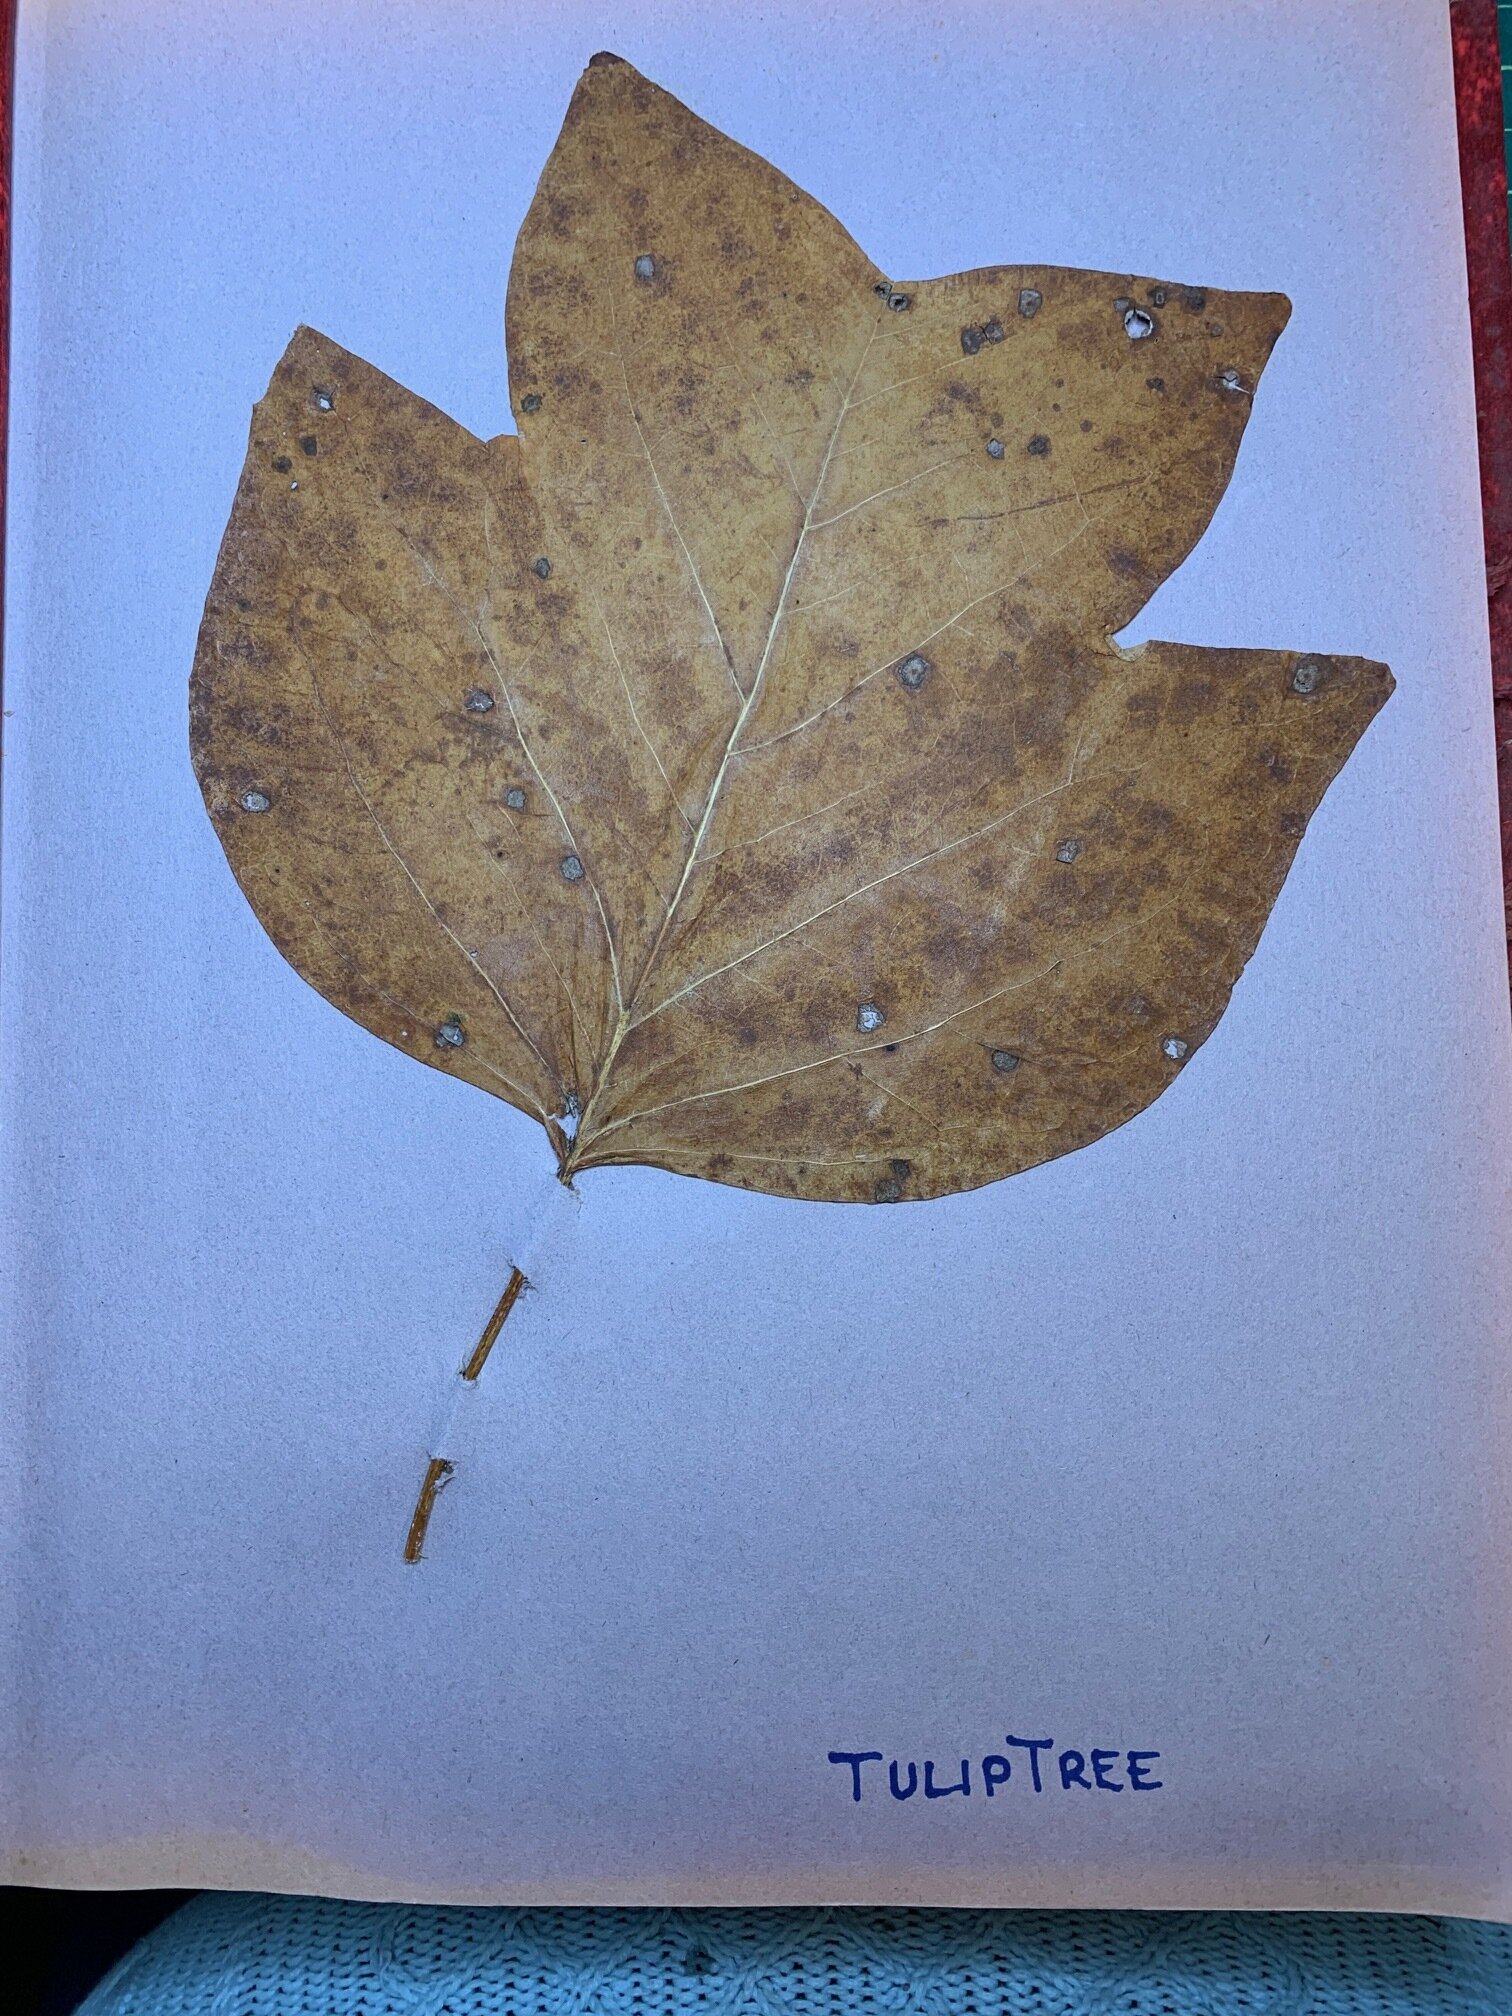
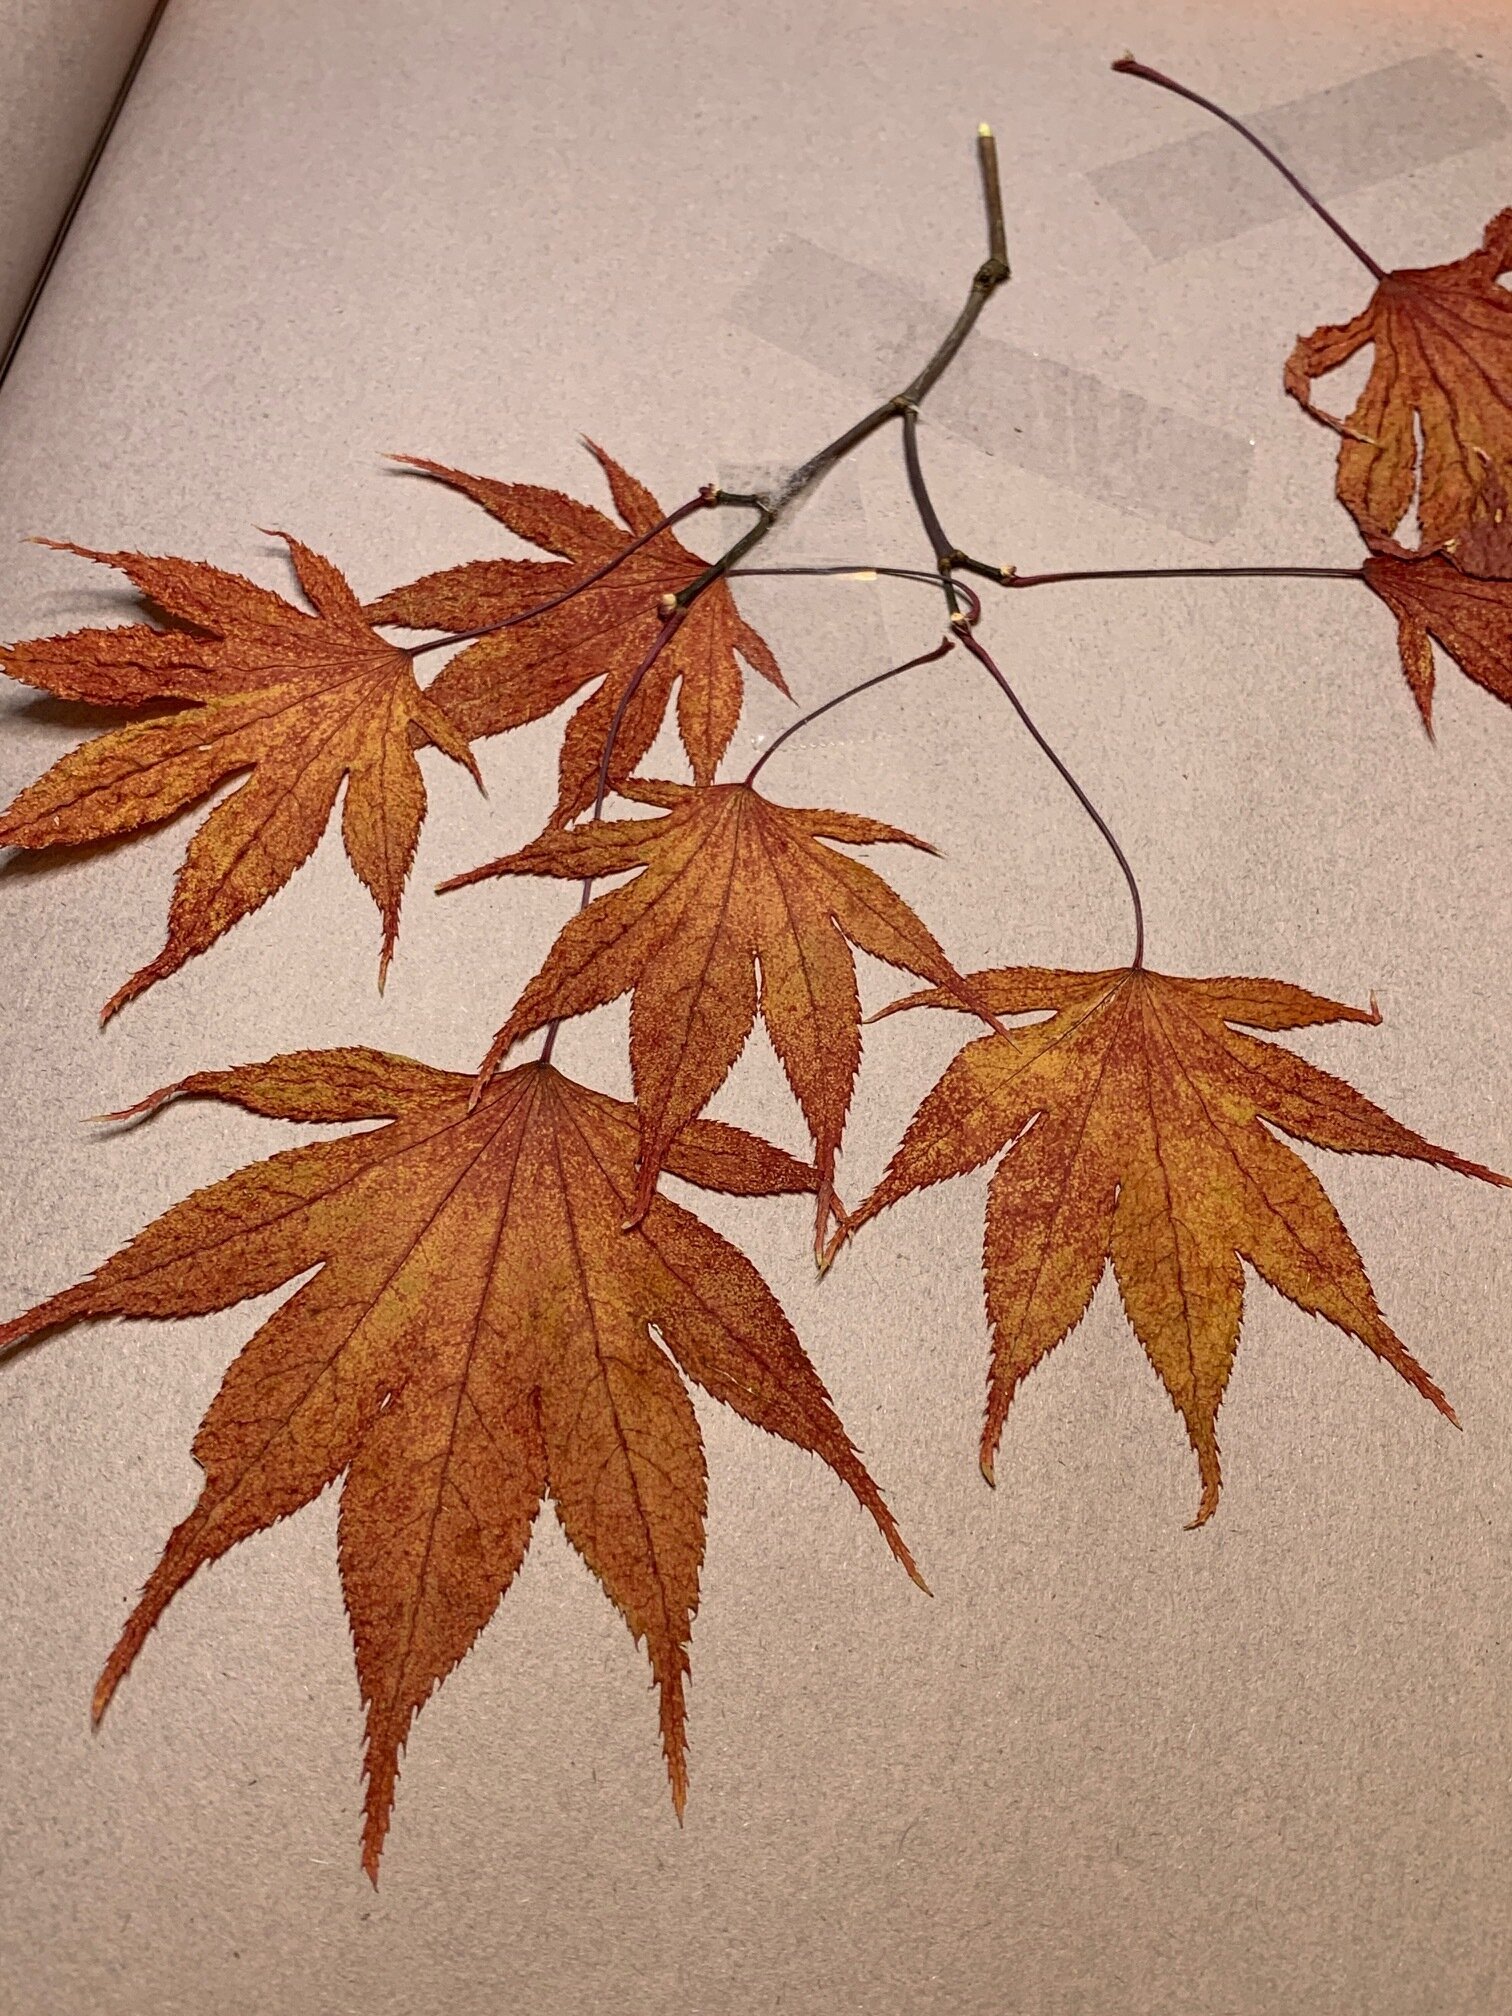
After we would all agree we identified the leaf correctly, we would carefully tape the leaf inside the scrapbook, making sure it stayed flat. Then we would take turns writing the name of the leaf on the page so we could remember the name and identify the leaves. Of course, we would also get out our pencils and crayons and trace or draw a few leaves too. After all, my fridge always seemed to need a new piece of art!
It was always such a good activity I enjoyed playing with my children. We got to “play” outside, exploring for a bit, and then go inside, and continue onto another project that all related to the environment and leaf collecting. Little did they know, I kept that scrapbook all these years and the leaves still look good!

I love seeing the pages where my children printed the names of the leaves when they were beginning to learn how to print and write their letters. Of course, those are my favorite pages! The other thing they didn’t know or realize at the time is the leaf collecting project became a wonderful scrapbook filled with reference material in it for me to refer back to time and time again, whenever I need to draw or paint a leaf. I think it is amazing how good all these leaves still look after all these years. And I still refer back to it!


Where did I come up with this idea? My mom of course! We used to flatten flowers or leaves inside a big heavy book, like an old encyclopedia, squishing the plant between two sheets of wax paper. We would check on it a few weeks later after it had time to dry. Every once in a while, you’d forget that you “hid” a flower inside a book, and years later, flipping through a book, a flower or leaf might fall out, which of course would always make us laugh. While we didn’t identify them and create one big scrapbook, my mom’s idea was definitely passed down to me.
Well, I hope this gives you some more ideas of things to do with your children or grandchildren. It is a very fun way to enjoy and learn about nature and our environment, too!

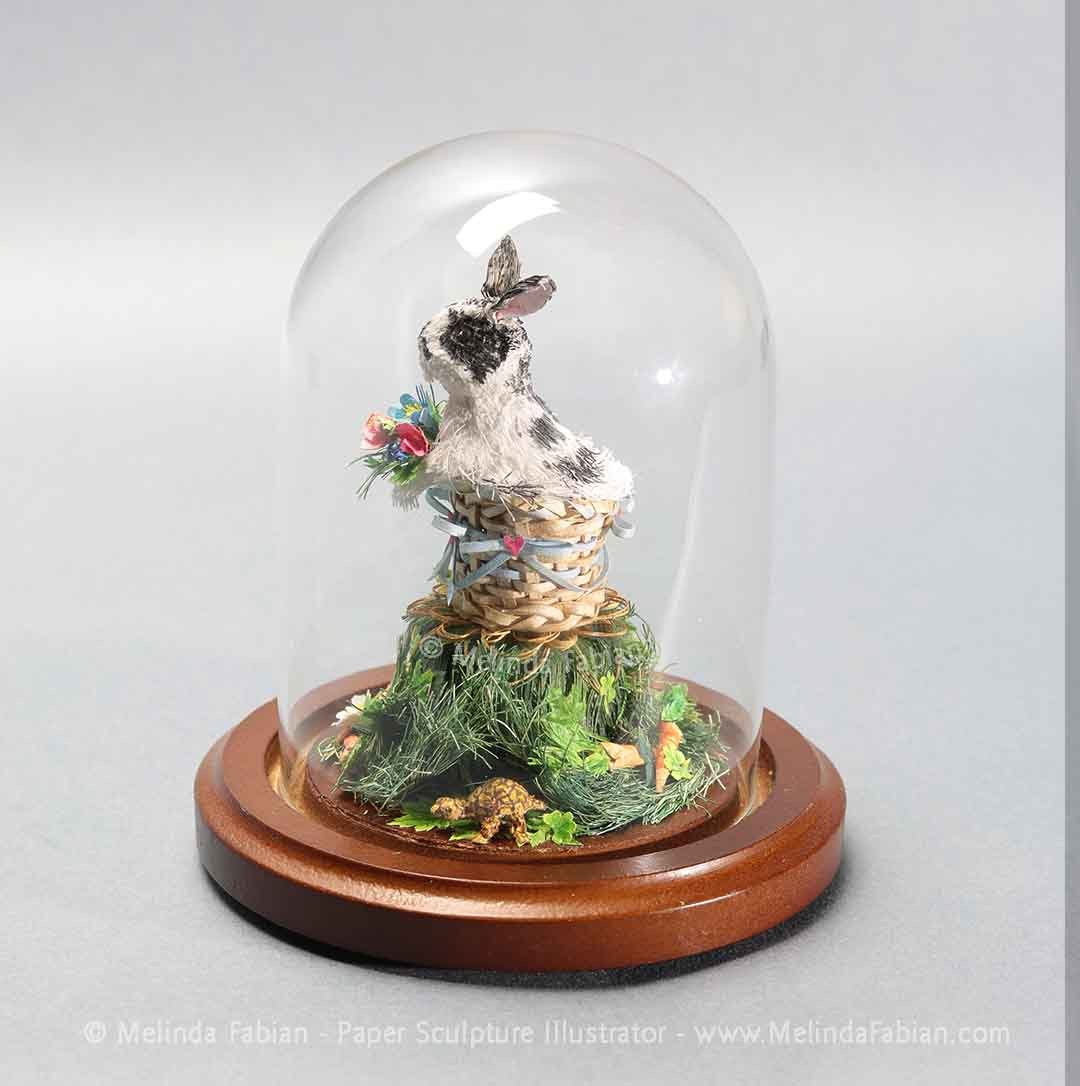
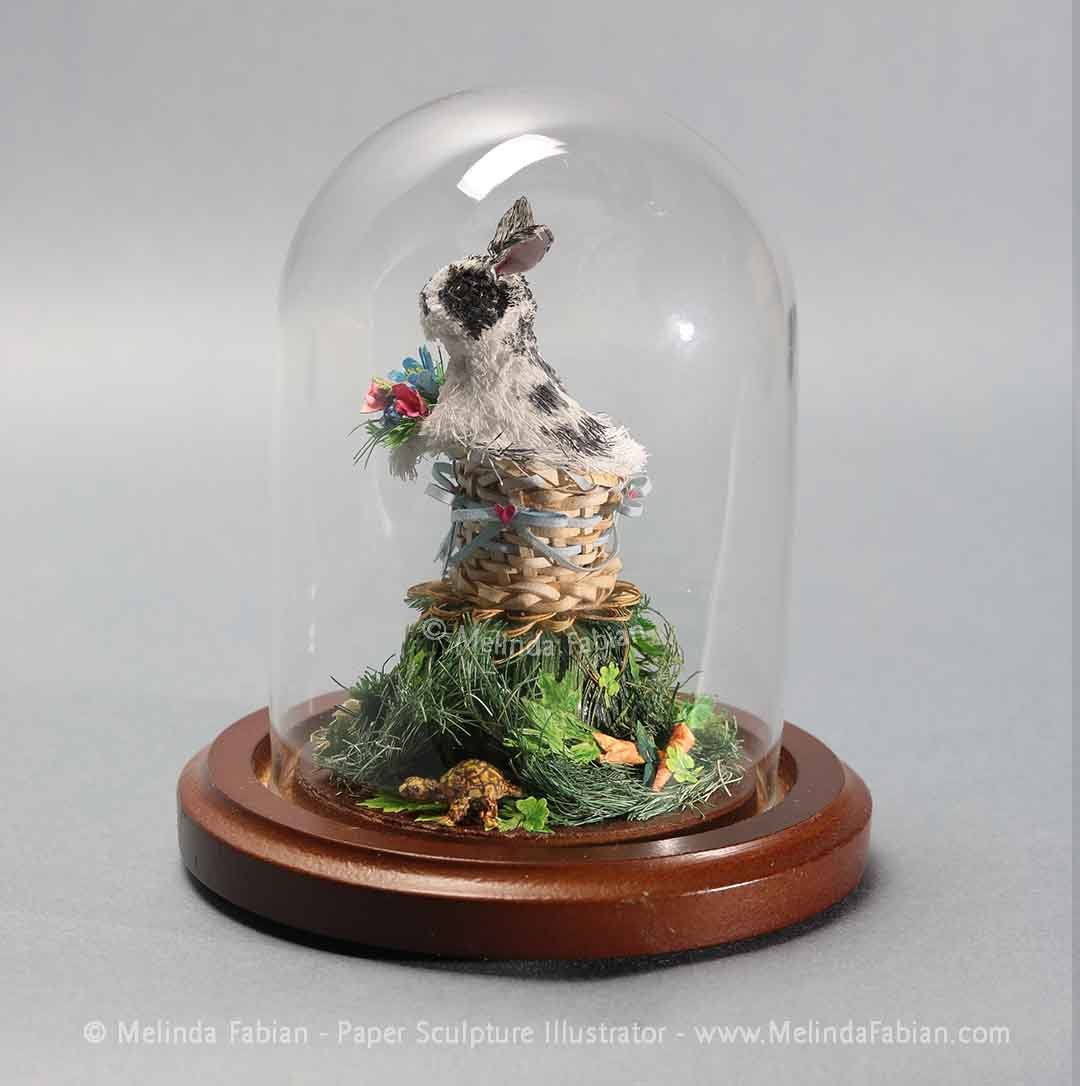
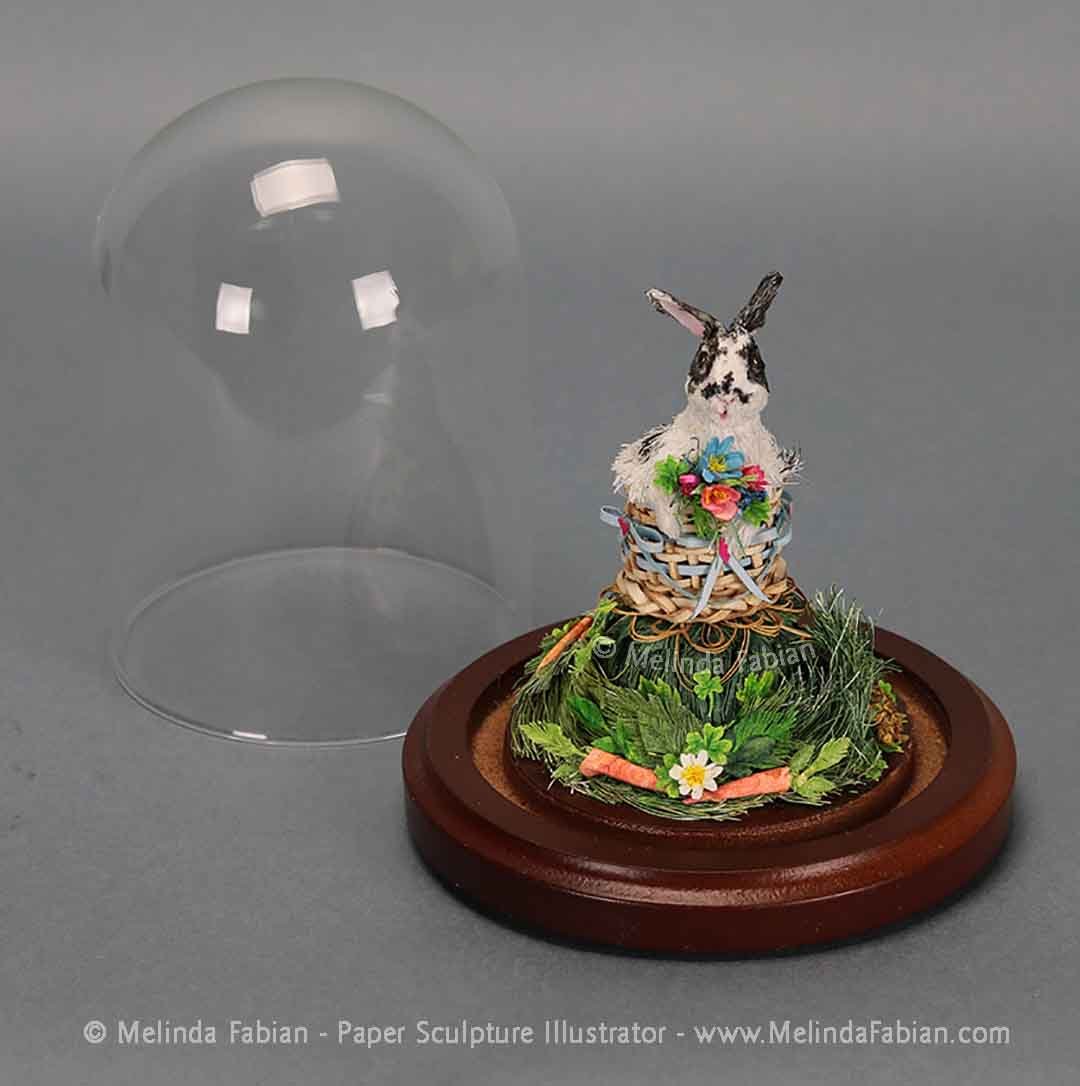
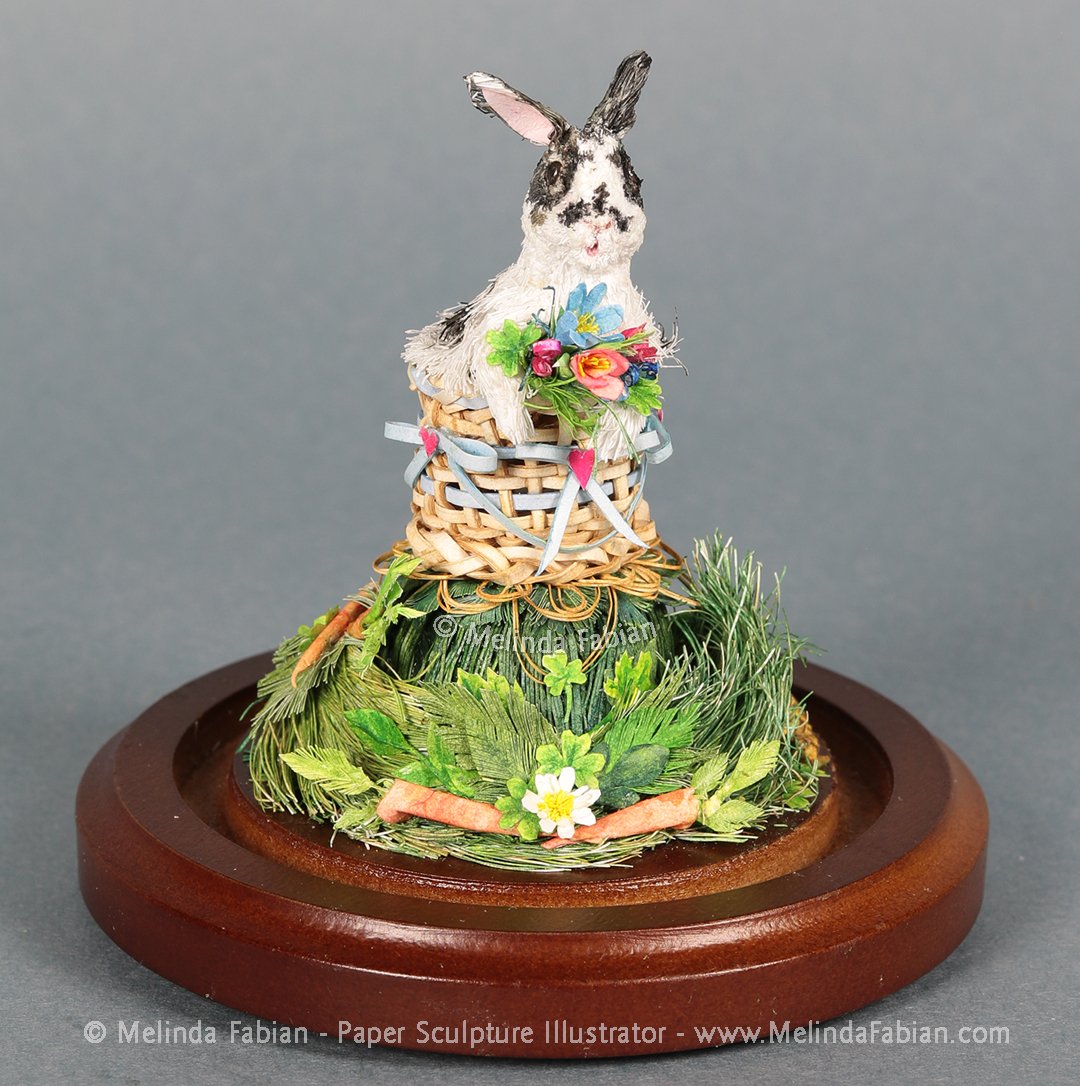
Paper Sculpture: ‘Can You Find My Lucky Four Leaf Clover?’
I wanted to make a whimsical, three-dimensional paper sculpture. This sculpture has a lot of details all made out of paper and paint. I will show close up details of the sculpture as I explain the story behind this piece.
I wanted to make a whimsical, three-dimensional paper sculpture for an upcoming miniature show. After doing some sketches, I came up with the idea of creating a little rabbit.
I wanted the bunny — who I call Flower — to be sitting on top of the hill she calls home. I also thought she needed a little basket to sit in so she can be comfy and cozy. I imagined that she is collecting and saving some of her favorite items and foods.
Now that I had my idea thought out and sketched, it was time to start working on all the pieces. Using white paper and a scissors, I cut lots of thin pieces of paper to create thin grass-like shapes. Then I took the grass shapes and formed them into a decorative hill for Flower to sit on. I wanted there to be a couple of holes at the base so she could stow away a special surprise.
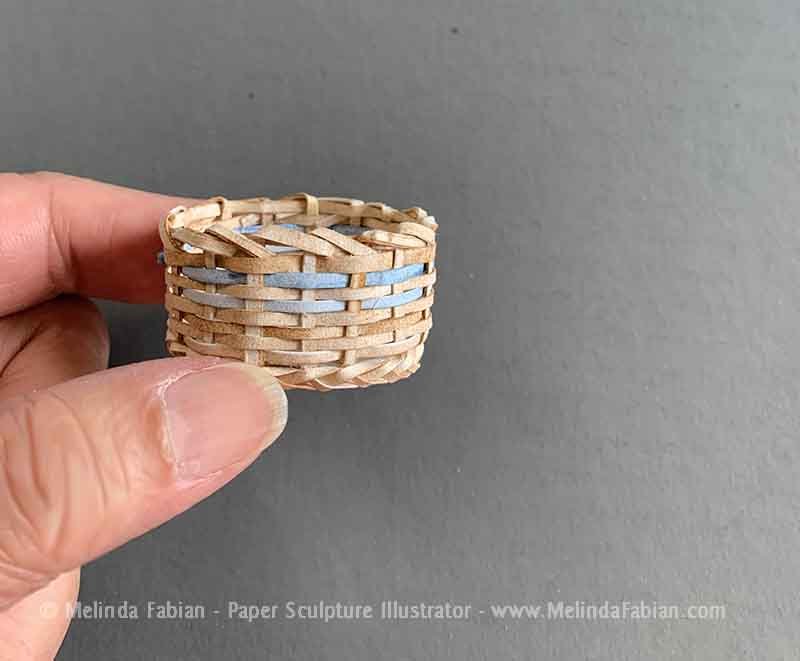
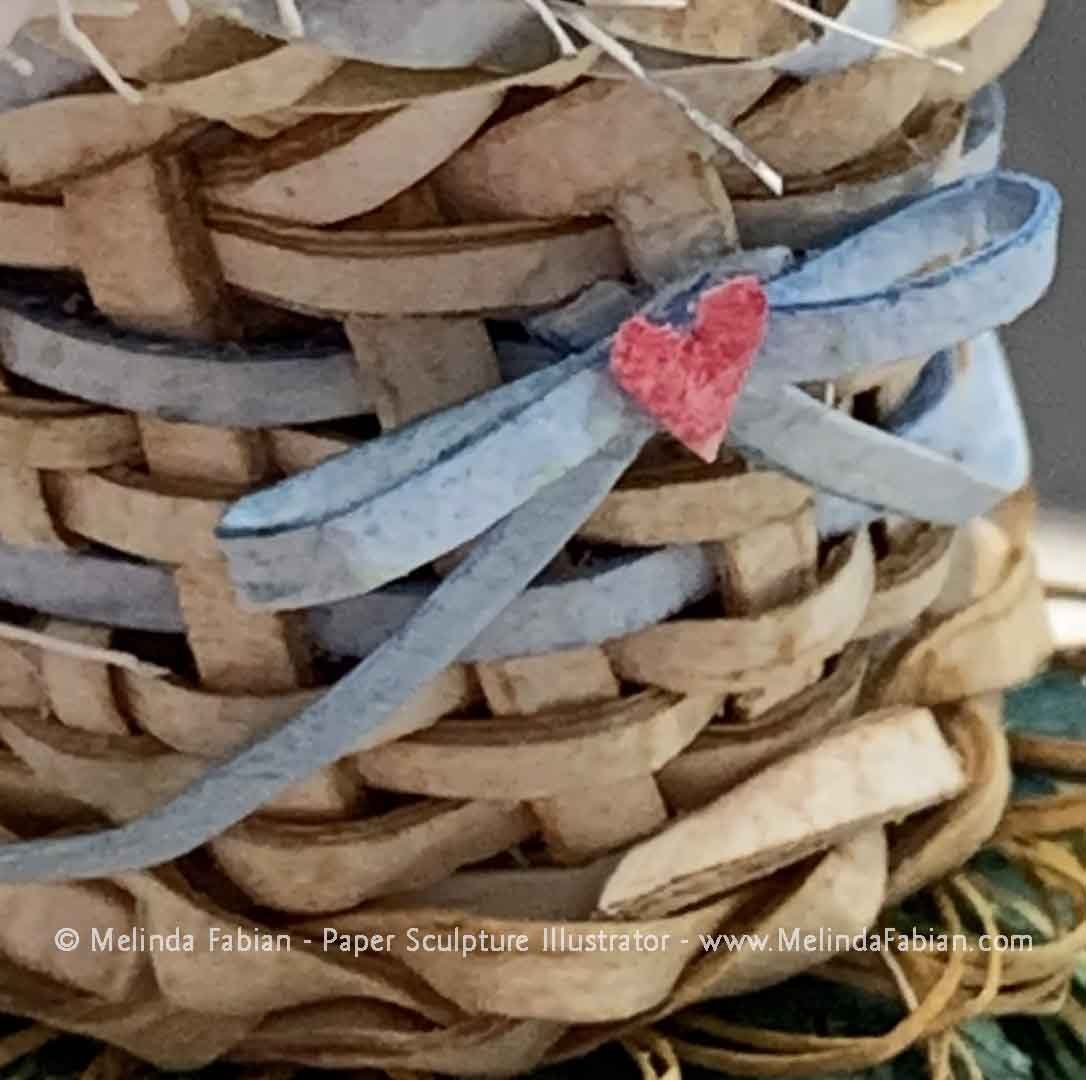
Next I needed to make a tiny little “wicker” basket all out of paper, of course. I’ve always love woven baskets, especially the different styles and shapes. I have collected many different styles and varieties of baskets over the years.

After weaving an actual-size paper “wicker” chair and table for a large-scale exhibition, I wanted to see if I could make a miniature basket using just paper and paint. I started with white paper cut into narrow strips. I was debating what color to make the basket, but then realized I didn’t need to narrow myself down to one color or style.
So, I painted the narrow strips of basket weaving paper into a couple of different colors so I could make a variety of baskets. One basket would be used for this paper sculpture. I also did a few additional weavings to plan for some other ideas I have in mind. After the paper was dry, I started weaving the basket.

After I made the basket, I started cutting the papers to make the rabbit. I wanted Flower to be sitting up in the basket with her arms over the sides. I also wanted her to hold a bunch of flowers that she collected to decorate her little home with.

I wanted the basket to sit on top of the hill. Because it is an important feature of her home, I had to make a little decorative ‘doily’ for the basket to rest on. I wanted the basket to look fancy too, so I cut out little hearts and attached those to each of the bows on the basket.

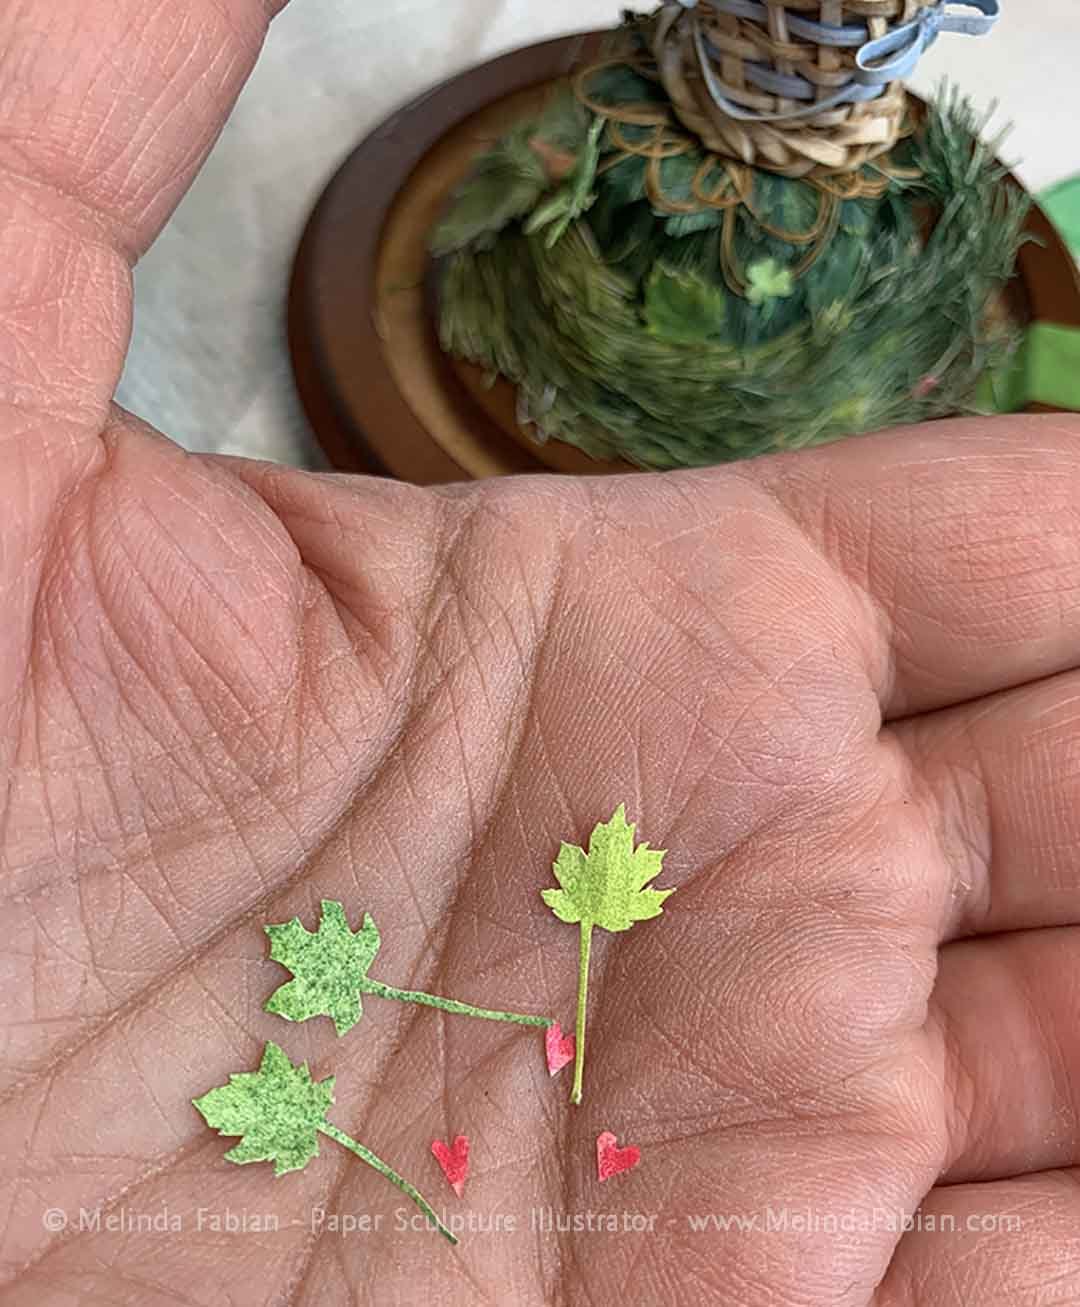
Next, I started cutting out maple leaves and carrots — lots of carrots of course! Then, I designed the outside of the bunny’s home. I also added clover and one little flower as additional decorations.
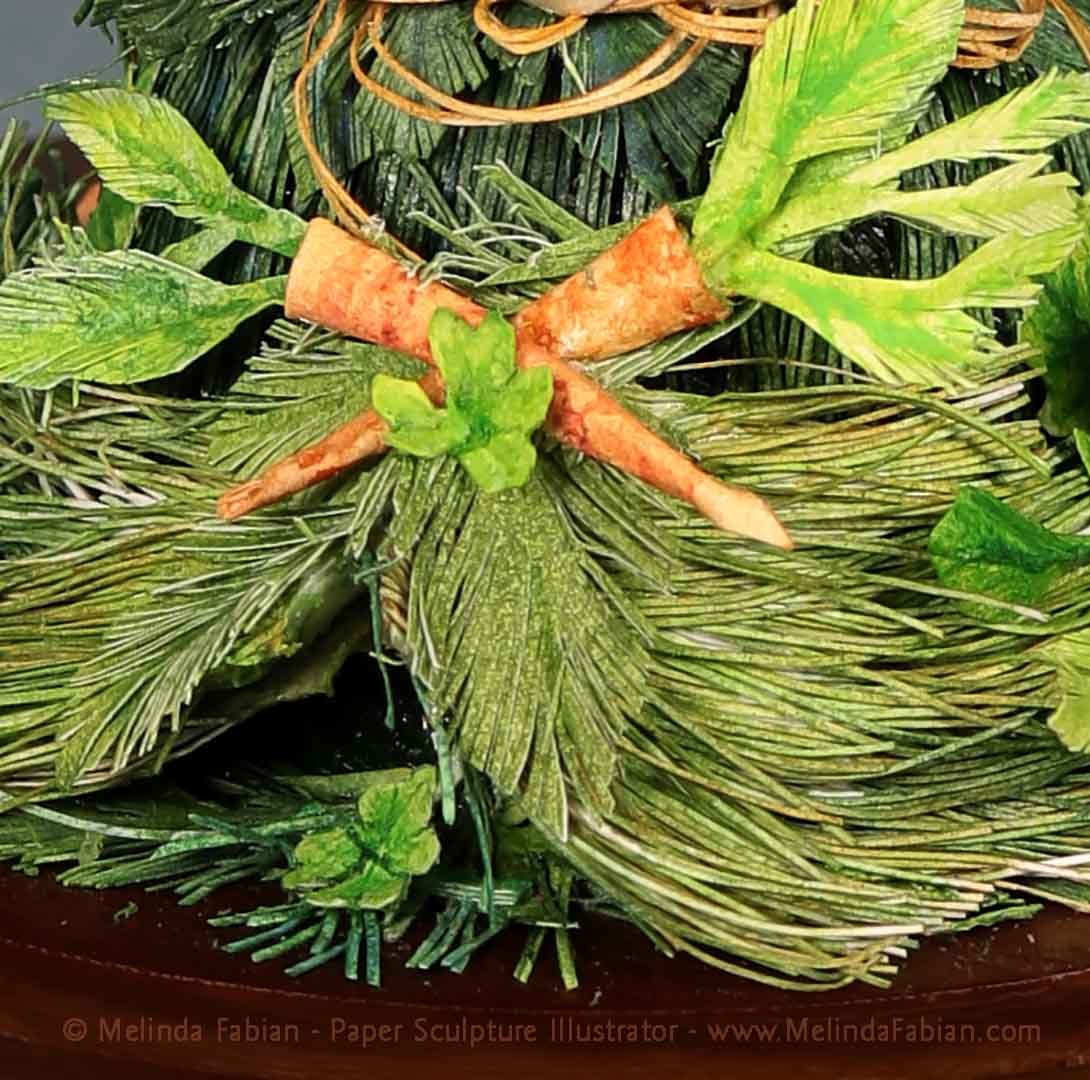
And of course, I had to include one of Flower’s little friends — a cute, teeny, tiny turtle. After all, everyone needs a friend in their life. Sam the turtle was made from paper that I painted in golds and browns. I was able to fit him inside one of the little openings in the grasses on the side of Flower’s hill.

Next, I needed to find a good spot to place Flower’s prized possession — her lucky four-leaf clover! And that finishing touch led me to the title of this artwork, “Can You Find My Lucky Four Leaf Clover?” Most recently, Flower and her home were on display at the annual Miniature Painters, Sculptors & Gravers Society (MPSGS) miniature show at the Mansion at Strathmore near Washington, DC.


Reflecting on My Art Studio, Old and New
Each studio I’ve had over the years has been a very different space. They’ve all had their own unique features and characteristics as well as something I really liked.
Each studio I’ve had over the years has been a very different space. They’ve all had their own unique features and characteristics as well as something I really liked. This is even true about my first studio, which was in an old apartment building. One day, my studio got rained on after the water pipes froze and burst in the unit on the third floor above me.
I am already loving my latest studio because I have a beautiful country view outside my window, which will be bigger and brighter after the new window is installed. Another thing I like is that the building is set back from the road, making it feel private and peaceful.
I also appreciate that my new studio has a door and is a separate room from the rest of the house. I can close the door to signal that my office is now closed. It gives me a sense of separation between work and life. And sometimes, it is just nice to know I can close that door and not have anyone, including me, catch a glimpse at my sometimes-messy desk.
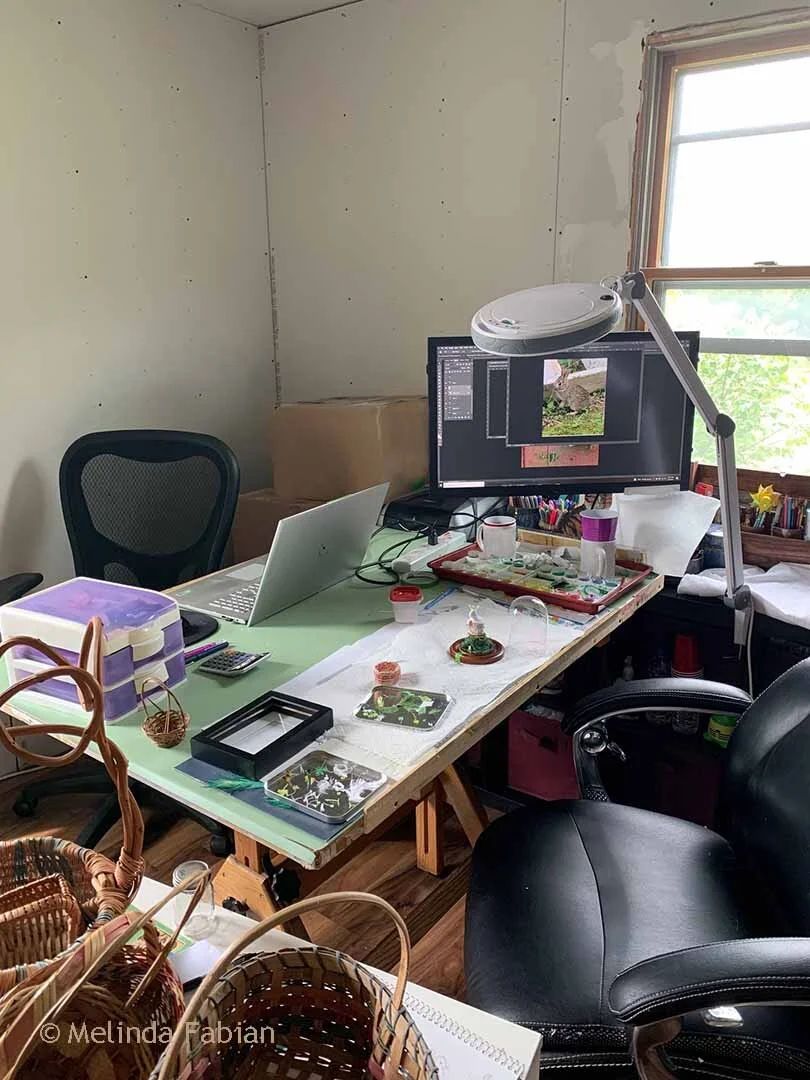
Because I am still in the process of renovating the new studio, I have lots of boxes that are still packed up. This can be a little frustrating, but I know I will be thankful when my dedicated art studio space is ready.
When work really gets started on my window, I will need to move out to the dining room table for a while. I am hoping by then to have my newest miniature art pieces completed, since it will be much more difficult to do miniature art at the table. I need a lot of bright light for those!

A ‘Window’ Into My Studio Renovations
Renovations are still underway, and I wanted to share more about what I have planned as well as some things I learned about creating a workspace that is just right.
I started telling you all about my new studio space after recently moving. Renovations are still underway, and I wanted to share more about what I have planned as well as some things I learned about creating a workspace that is just right.
I am waiting to have a large bay window installed in my studio, which will be wonderful light. When I first had my desk set up in the studio, I placed it facing the window that I am opening into the bay window eventually. After a few days, I quickly realized that wasn’t the right spot and shifted everything around. It took me a couple of tries as I kept moving my desk until I decided which location felt most comfortable.
I definitely would recommend setting up your studio and testing a few different configurations to see what really feels best. Live with the desk in its new location for a couple of days to see if that is the correct placement. Is the light coming in the room at a good spot? Or do you prefer your desk in a different part of the room? It is easier to move everything around before everything gets unpacked!
I did figure out one neat way of utilizing my large, 48-inch by 36-inch drafting table. I use the one side of the drafting table to do my paper sculpting and painting. Before, the other half of the desk wasn’t used and quickly become a space where loose, miscellaneous papers piled up into a messy stack.
This time I set the other side of the table up for my computer work. I don’t know why I never thought of this before! It seems like such an obvious solution. I was very close to sawing off the back half of the desk to give me more space in my studio since it is a bit smaller room than my previous one. I am so thankful I didn’t do that!
Now I can keep my computer on the other half of the table, which is so convenient. I don’t have to clear my desktop off just to use my computer — I always have a clean space for it in order to work on the business side of things. Somehow, I even had an extra comfy office chair that I can keep on both sides of the drafting table.

Or should I say… Now my cat Molly and I both have a nice, comfy desk chair available!

Since I finally decided where I want to keep the desk in my studio, I was able to have my monitor installed on the wall. After using my small desktop computer for months, I forgot just how big my monitor screen is and how nice it is to use for reference material.
The spot where I mounted the screen is on the wall but over the middle of my desk. That allows me to turn the monitor to whichever side of the desk that I am working on. When I am working on my computer, I can turn the monitor to face me. I can then have the monitor with my reference photos up on the screen, facing my workspace where I can paint and sculpt.

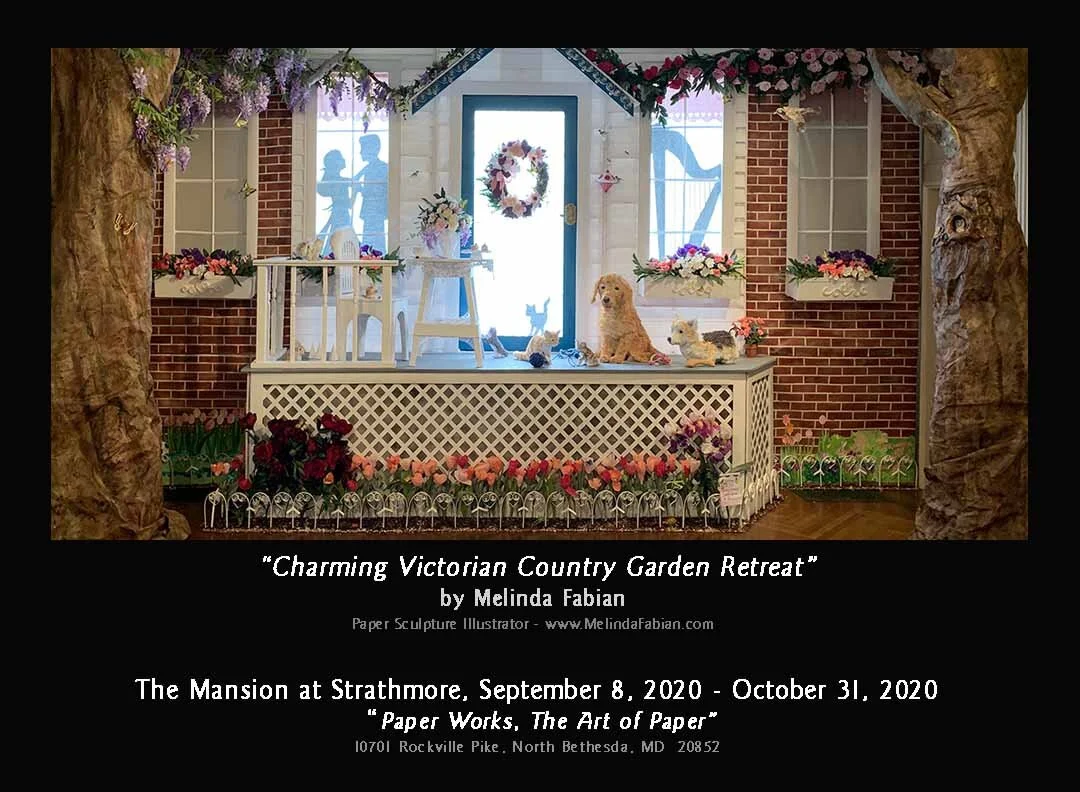
How Viewers Perceived My Country Garden Retreat Installation
With my “Charming Victorian Country Garden Retreat” exhibition, I hoped people viewing the art would take away feelings of contentment and peace.
As an artist, when I create a new piece, I am not only considering the piece I want to make, but also the feeling, thought or emotion I want the viewer to experience and take away from my art. I like creating fun art that engages viewers with my art, hoping it makes them feel joy.
One of the problematic issues as an artist, like many of us who work alone in a studio, is you can only imagine how your audience will receive your art and hope it is in the way you planned. But, unless you are at a gallery watching or talking with guests, you can never really be certain how the art was perceived.
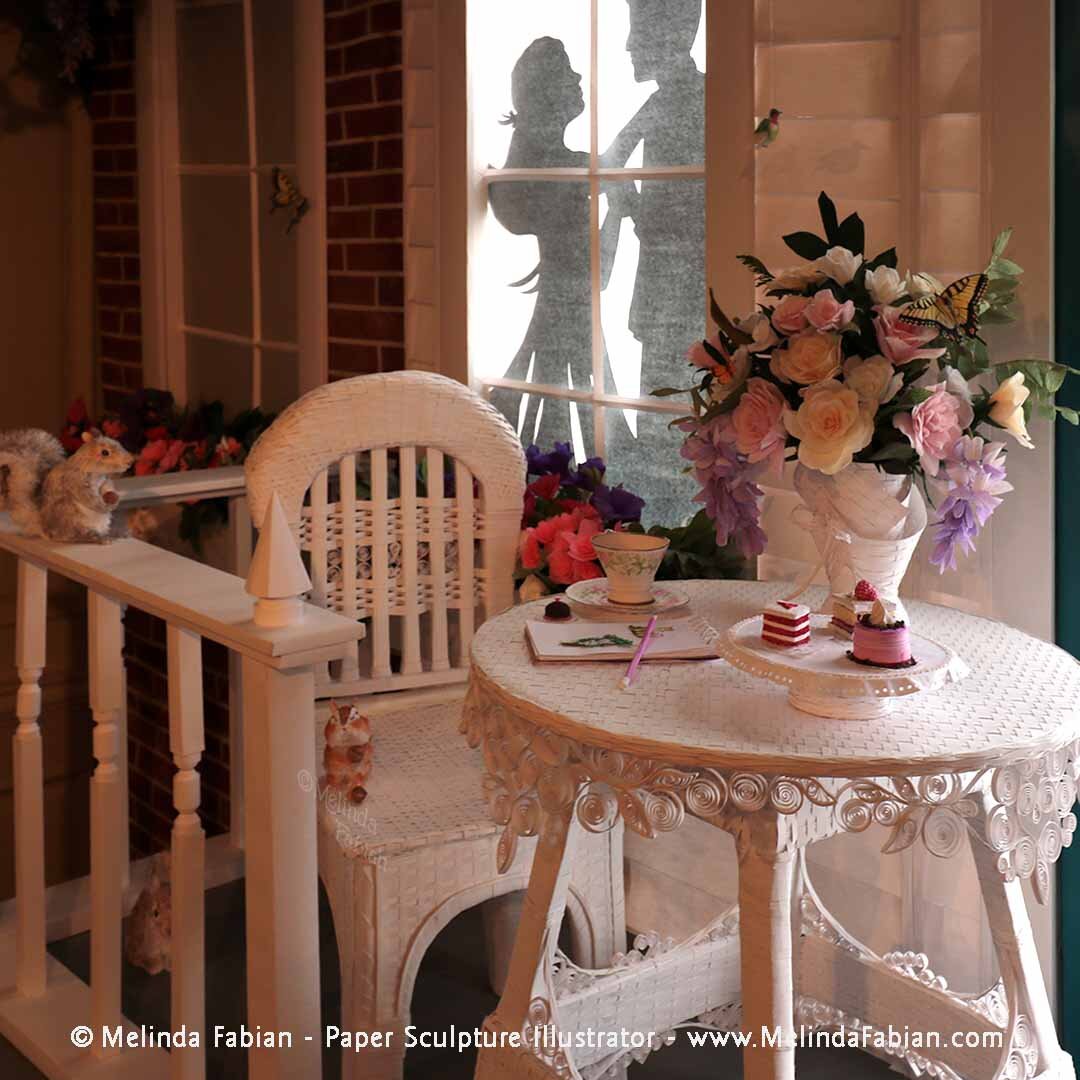
With my “Charming Victorian Country Garden Retreat” exhibition, I hoped people viewing the art would take away feelings of contentment and peace. The porch scene would be a place where they could want to come and have a cup of tea — a place to relax and enjoy themselves. And, of course, as they look at my art, I was really hoping they would begin to notice all the details I added such as the family pets, birds, butterflies, ants, bumble bees, and the not-so-obvious items such as a dragon fly, caterpillars, and pinwheels. I wanted to help capture this moment in time for viewers, long enough to realize the beauty in these everyday experiences we often walk right past.
I also was curious what people’s favorite part was of my country garden paper sculpture installation. I have my favorite things to create, and even one or two things that I would prefer to not make again. But what about those who saw it in person?

This installation was such a large project — about 1.5 years’ worth of work — and I was curious how my plans compared with people’s real experiences of the work. I decided to send out a mini survey to some of the people who viewed my art installation in person. I kept asked two questions:
1. What was your favorite part of my paper sculpture installation?
2. How did it make you feel when you viewed my art?
Here were the results from my very unscientific survey:
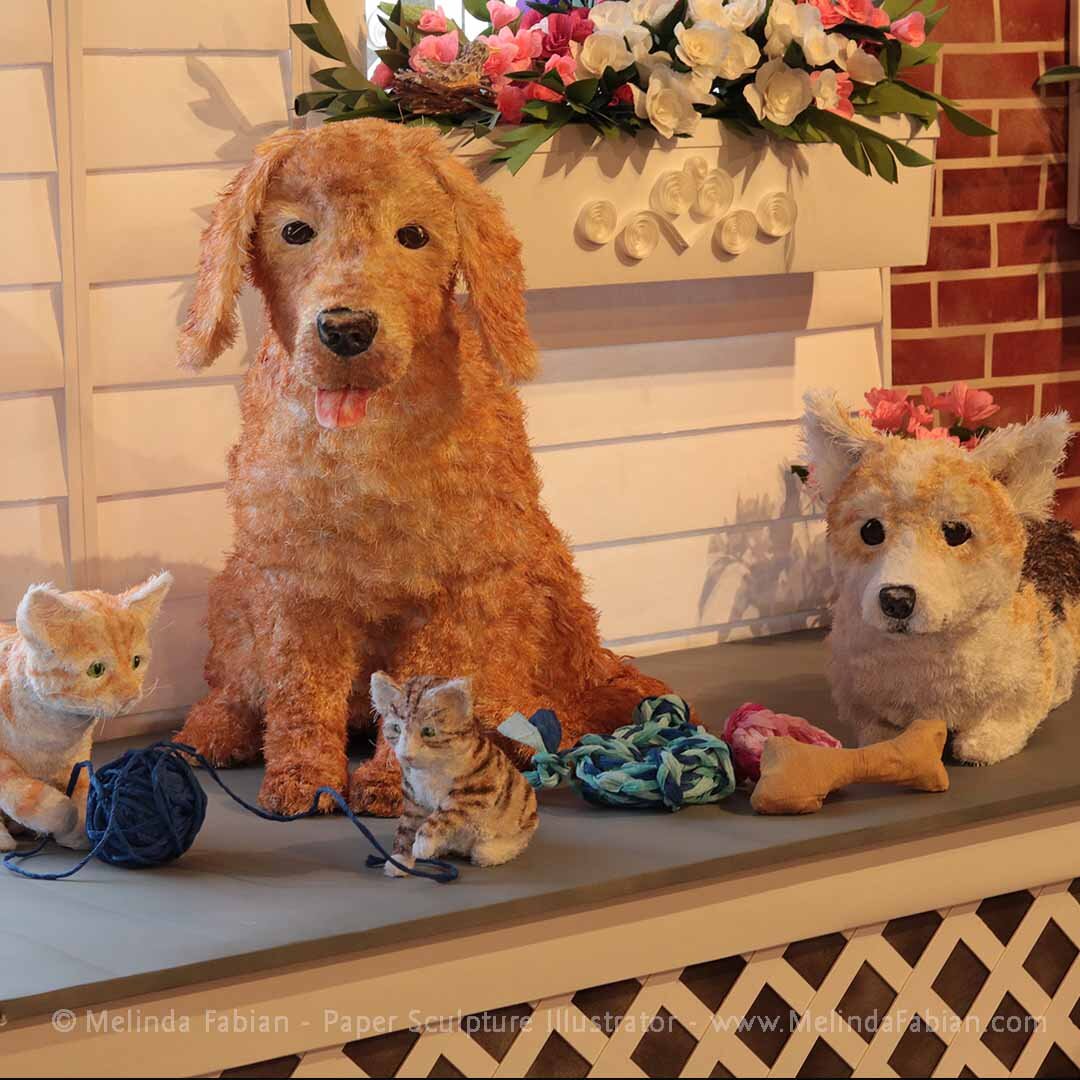
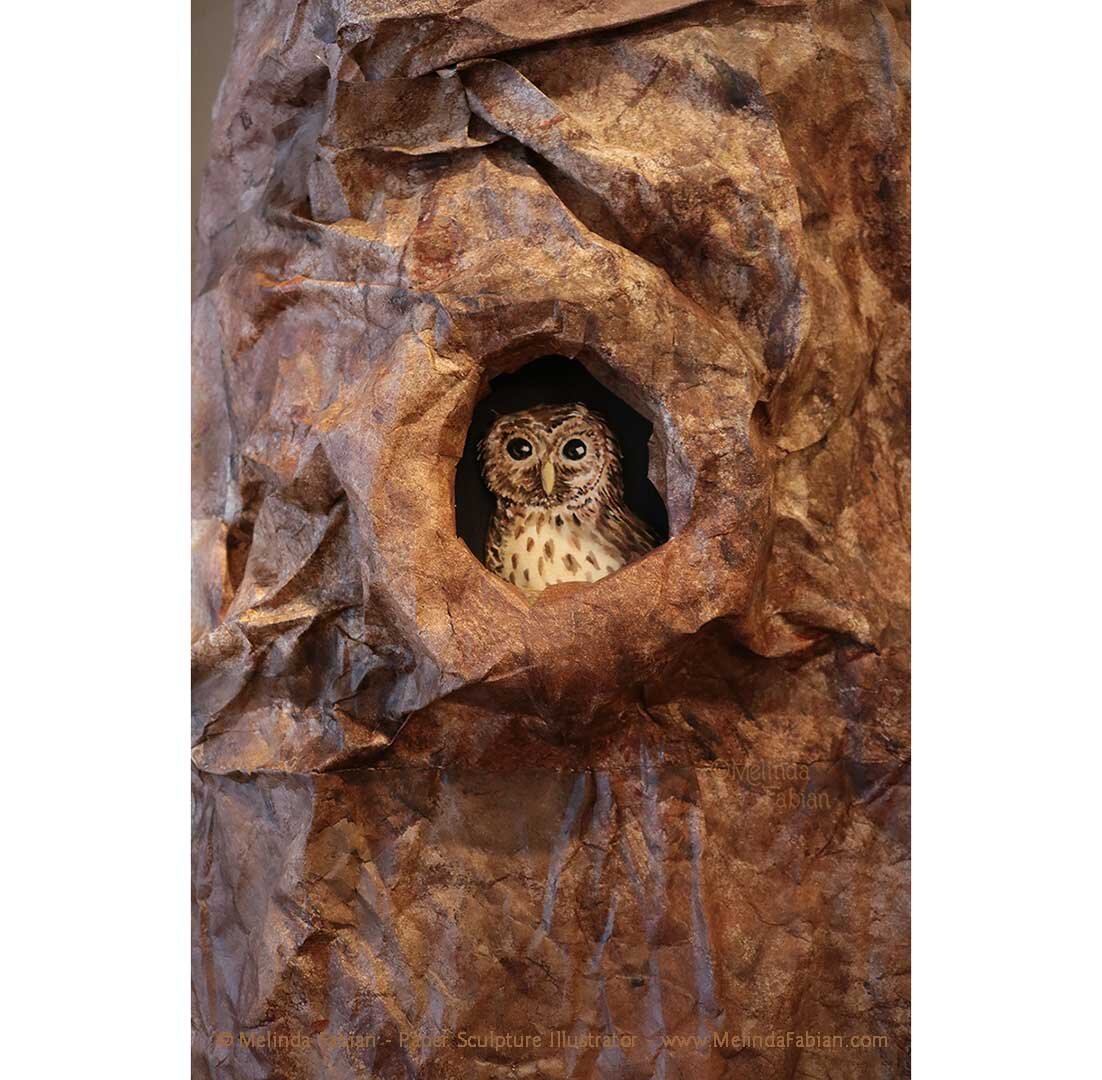
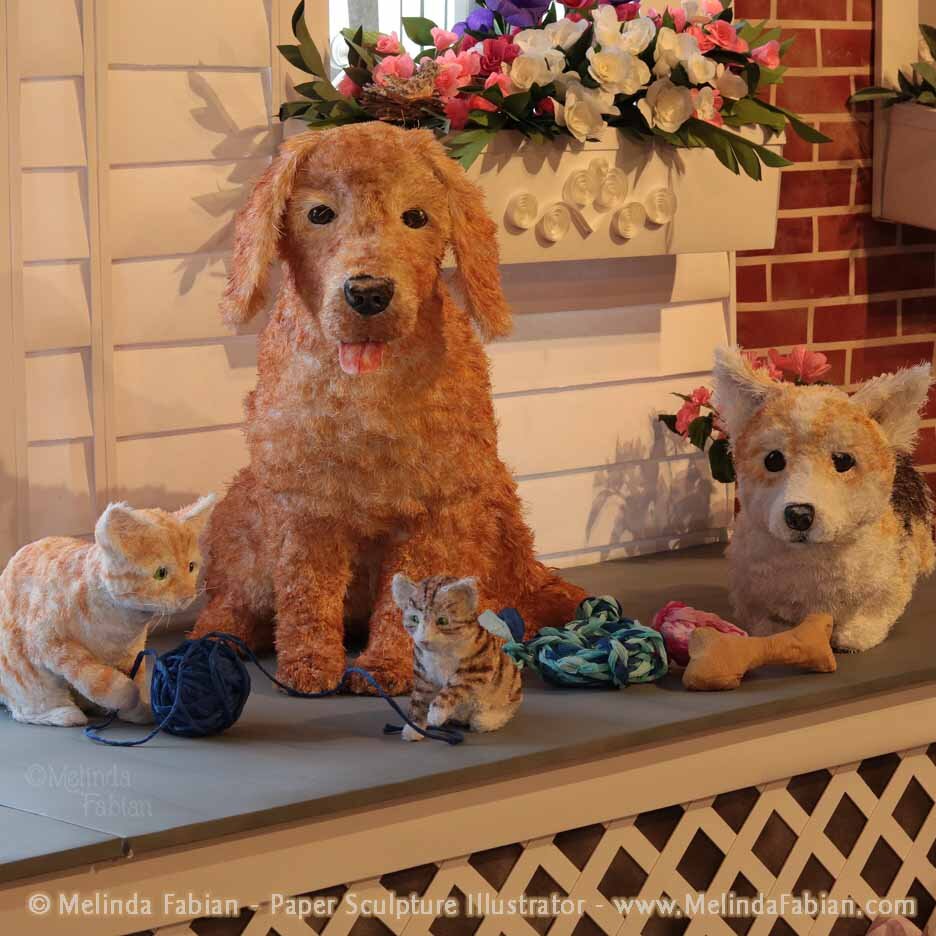
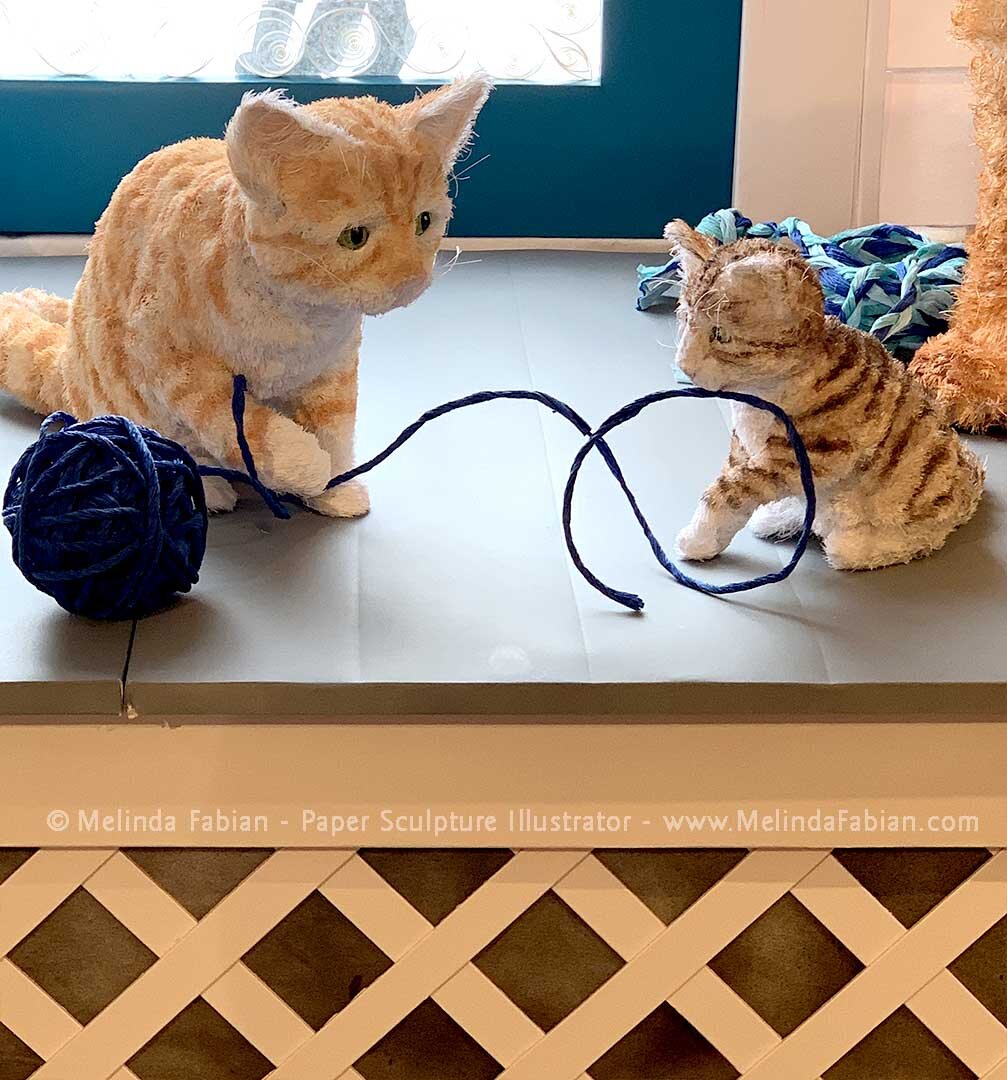
Perhaps unsurprisingly, people had many different answers for their favorite part that spanned the entire installation. The animals, including the turtle, owl, corgi and dogs, cats, all the butterflies and moth, and the character of the ants. One said they liked all the animals, and the “sense of playfulness.”
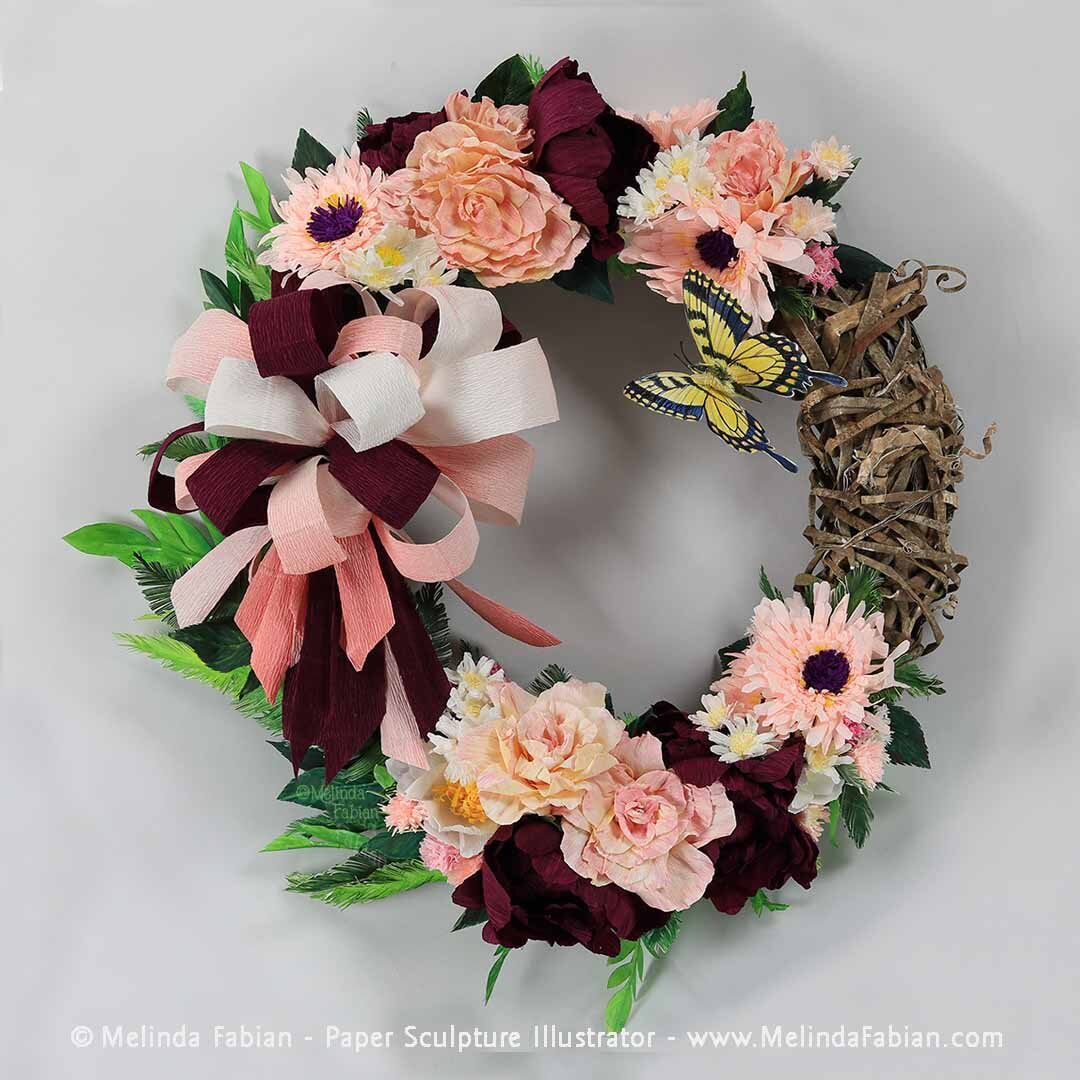
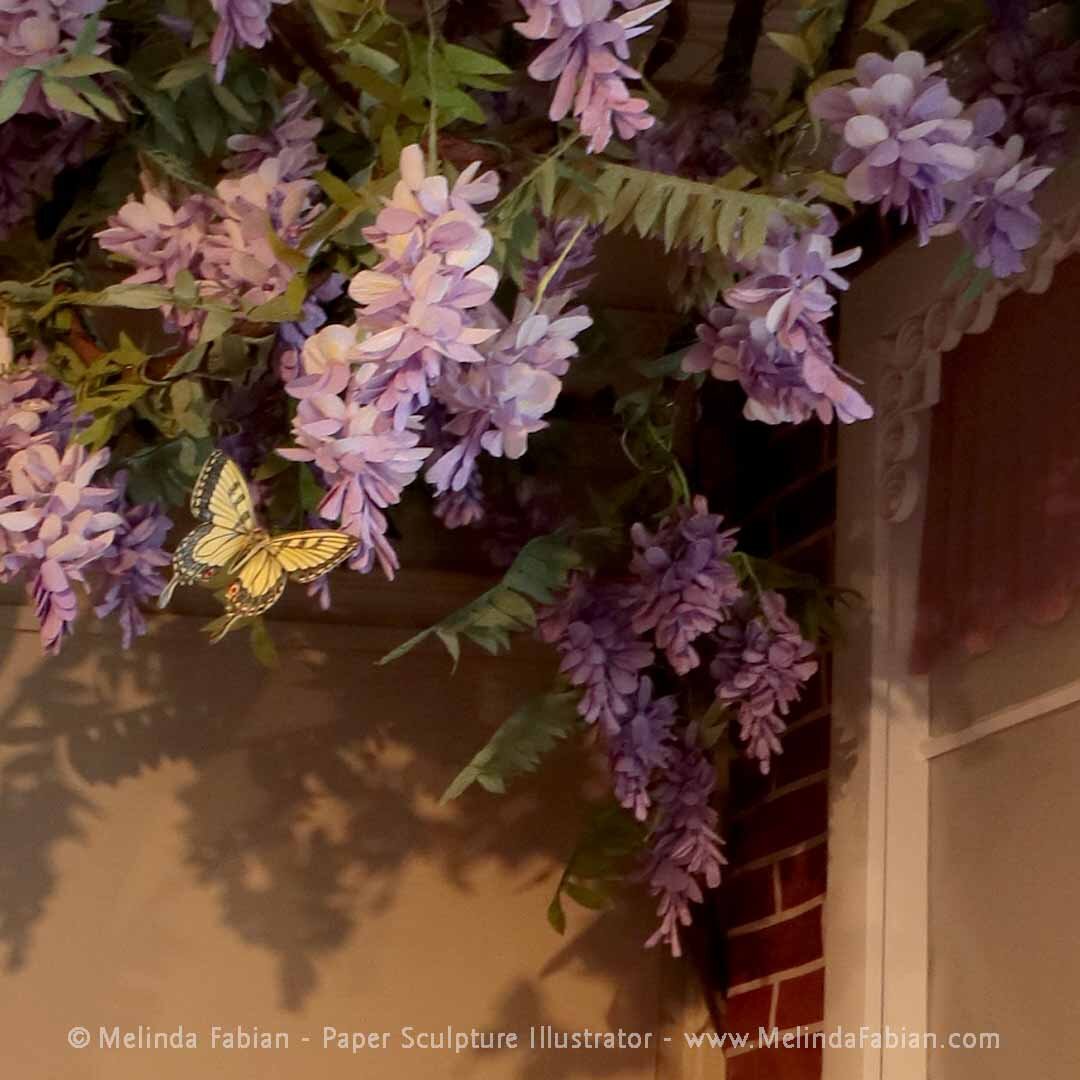
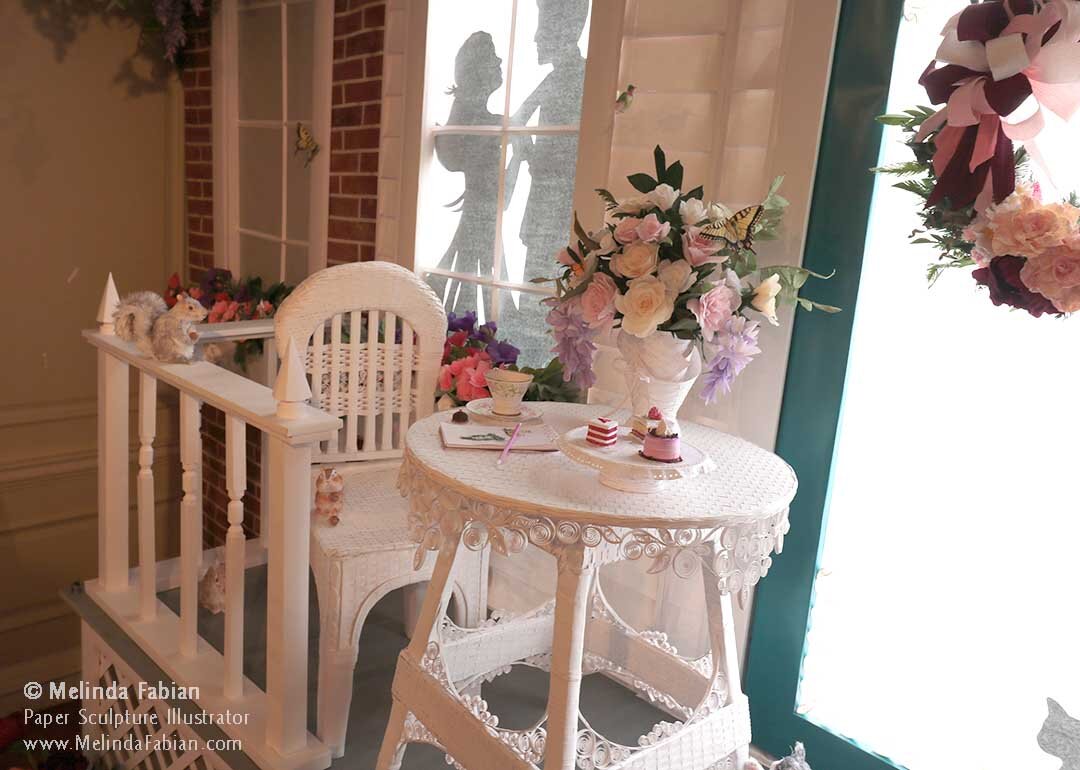
For others, it was the setting that really stood out, including the hand-woven wicker paper sculpture table and chair, grapevine wreath, flowers in the vase, the silhouette of the couple dancing, and the teacup. The wisteria, peonies and all the flowers also got votes, along with the hidden objects throughout the installation.


When I asked how the art made people feel, I also got such a wonderful variety of responses as to what spoke to people. Many expressed the detail and finding hidden treasures among the work made them smile — there was a joy in finding something new every time you look at it. There was also surprise that the entire installation was made out of paper!
Some found a sense of love and romance because of the couple dancing in the window in the background of a nostalgic porch scene. Others felt content and peace, relaxation in a peaceful garden, nostalgia for simpler times and a reminder of being young.
“It's such a creative representation of how beautiful things can be we walk past every day and seeing it in art form where there are new things to discover every time you look is a reminder to do this out in the real world too,” said one visitor.


I am happy to see the fur critters were so popular, since they are something that I really enjoy making. It was a pleasant surprise to see a nice variety of items people liked, especially because I included such a spectrum of smaller pieces for the installation, from the trees to the smallest ant. I was also glad that several people mentioned it reminded them of yesteryear — feeling nostalgic, relaxed on the porch, and of course, the fun of looking for all the objects.

20 Fun Facts About My Country Garden Paper Sculpture Installation
This week, I thought I might share some fun facts about the installation, including how much paper it took, how many roses are in the installation and more.
You may have seen my FAQ post from last week, where I answered some of the most common questions I get about my large-scale paper sculpture installation, “Charming Victorian Country Garden Retreat,” currently at the Paper Works show at the Mansion at Strathmore. This week, I thought I might share some fun facts about the installation, including how much paper it took, how many roses are in the installation and more. Let me know what you think!
1.) It took me 1.5 years of working on the installation full-time to complete “Charming Victorian Country Garden Retreat.” I worked 40–60 hours a week in the first months, but the last six months, I was working on the project 60–80 hours a week, sometimes more.
2.) It took approximately six weeks to sketch, come up with a tentative schedule, develop a plan in detail of the display, and research art papers I was going to use in the installation.

3.) Approximately 29 square feet of paper was used to make this squirrel.

4.) It took five weeks to construct, build, assemble, and weave this table and chair — this does not include the time it took to do the research, sketches, design, and planning out how I was going to make the furniture or the amount of time it took to prepare the paper to begin the weaving process. That took about an additional two weeks.

5.) I made three miniature cardboard models of different chair deigns to help me figure out the construction of the chair and a basic design shape.
6.) Every piece of paper that was used to weave the chair and table had to first be hand-cut to the correct width.

7.) To make the “brick” walls, I spray-painted paper. I added sponge painting overtop to give the bricks added texture.

8.) The first harp silhouette I cut out tore when I was hanging it in the window. I had to remove it and cut a new harp silhouette. The second harp turned out even better than the first one, so it was a happy accident!
9.) Did you see the soccer ball in the flower garden? The soccer ball is also three-dimensional and comes out of the flat paper background. I added it to the flower garden because I wanted to add some hints that children “live” here too, not just grown-ups.

10.) In many of my illustrations and art projects, when possible, I will include things that relate to members of my family. One of several in this installation is Cricket the cat, which is named after my daughter’s cat. He was also used as a reference point for this furry critter.

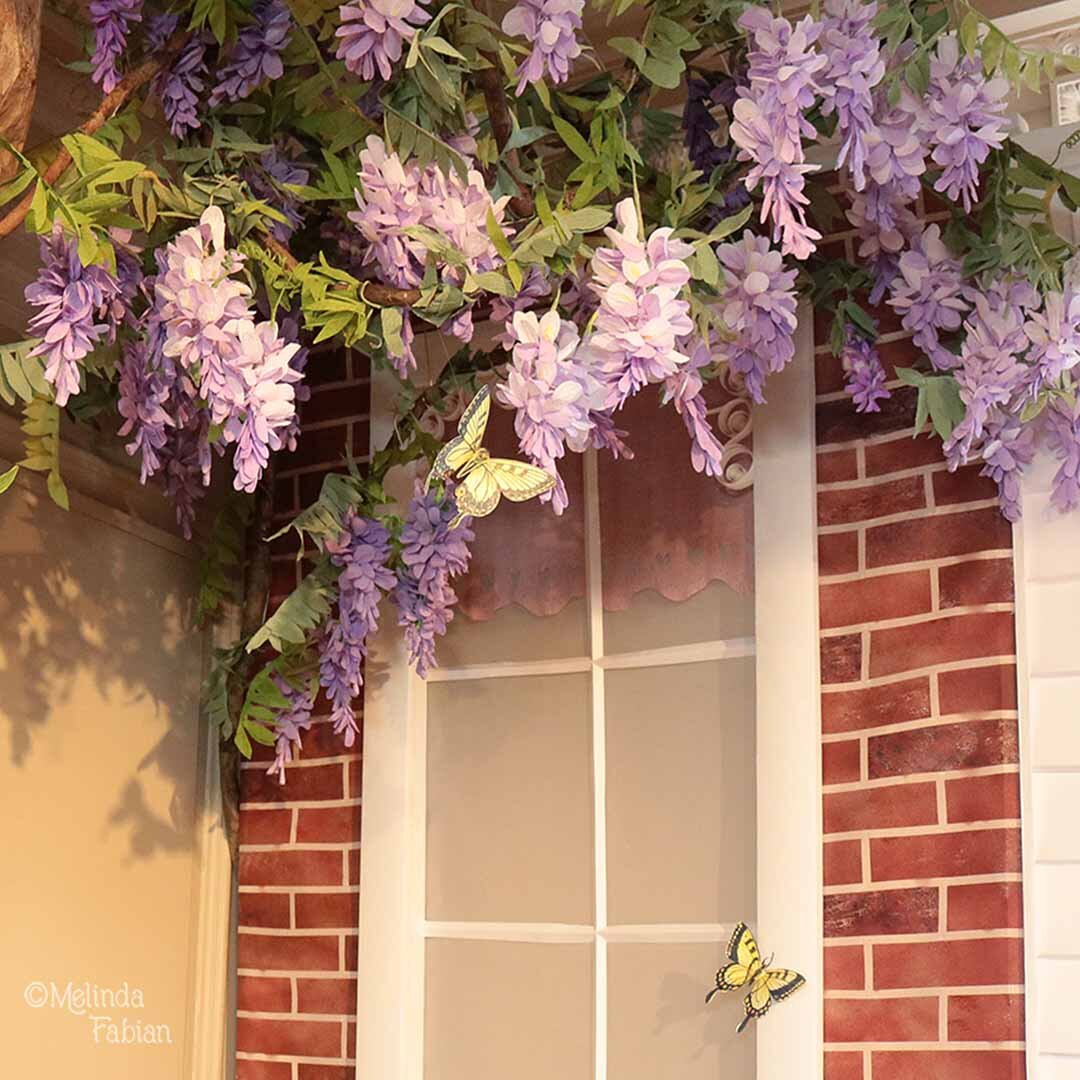
11.) It takes 2.5 hours to create one wisteria flower because each petal is individually attached to the stem.
12.) Over 80 wisteria flowers were paper sculpted for this installation.
13.) Over 75 roses were used in the climbing roses.

14.) Over 80 white and ivory roses make up the trellis.

15.) It took four days to install the full paper sculpture piece at the Mansion at Strathmore.
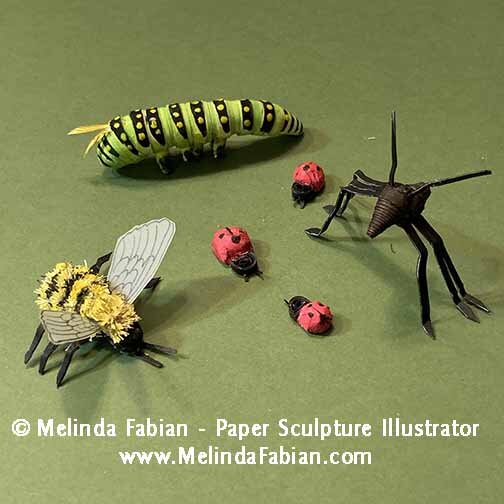
16.) Over 15 ladybugs inhabit the scene. (Can you find all of them?)
17.) There are also four bumble bees in this garden retreat.

18.) At least 17 butterflies can be seen at the exhibit.

19.) Four cats, two dogs, two squirrels, one chipmunk and two adorable bunny rabbits live at the “Charming Victorian Country Garden Retreat.”

20.) My favorite thing to make for the “Charming Victorian Country Garden Retreat”? Honestly, I loved making all of it. Yes, there were some aspects of the final paper sculpture piece that were more challenging than others, but truly, I loved every minute of this project. I am so thrilled to be a part of Paper Works: The Art of Paper. Thank you Strathmore!


‘Charming Victorian Country Garden Retreat’: Frequently Asked Questions
From how much paper I used to my inspiration for the paper sculpture, here are answers to 12 of my most frequently asked questions.
As I have been talking about my “Charming Victorian Country Garden Retreat” installation in the Paper Works show at the Mansion at Strathmore, there are several questions that I have been asked often. From how much paper I used to my inspiration for the paper sculpture, here are answers to 12 of my most frequently asked questions.
1. What was your inspiration for this piece?
I want to use my art to bring families together, creating three-dimensional habitats that remind people to look for the little everyday moments that happen all around us that bring us joy and serve as a reminder of what is really important in life.

2. How long did it take you to make this paper sculpture installation?
I was asked to participate in the Paper Works show in October 2018. In April 2019, I had my first in-person meeting with the curator, Lesley Lundgren. After that meeting, I began working on the installation in earnest. So, about 1.5 years working full time, beginning with the sketches, then continuing on to create each individual paper sculpture element for the installation.
3. How big is the final installation?
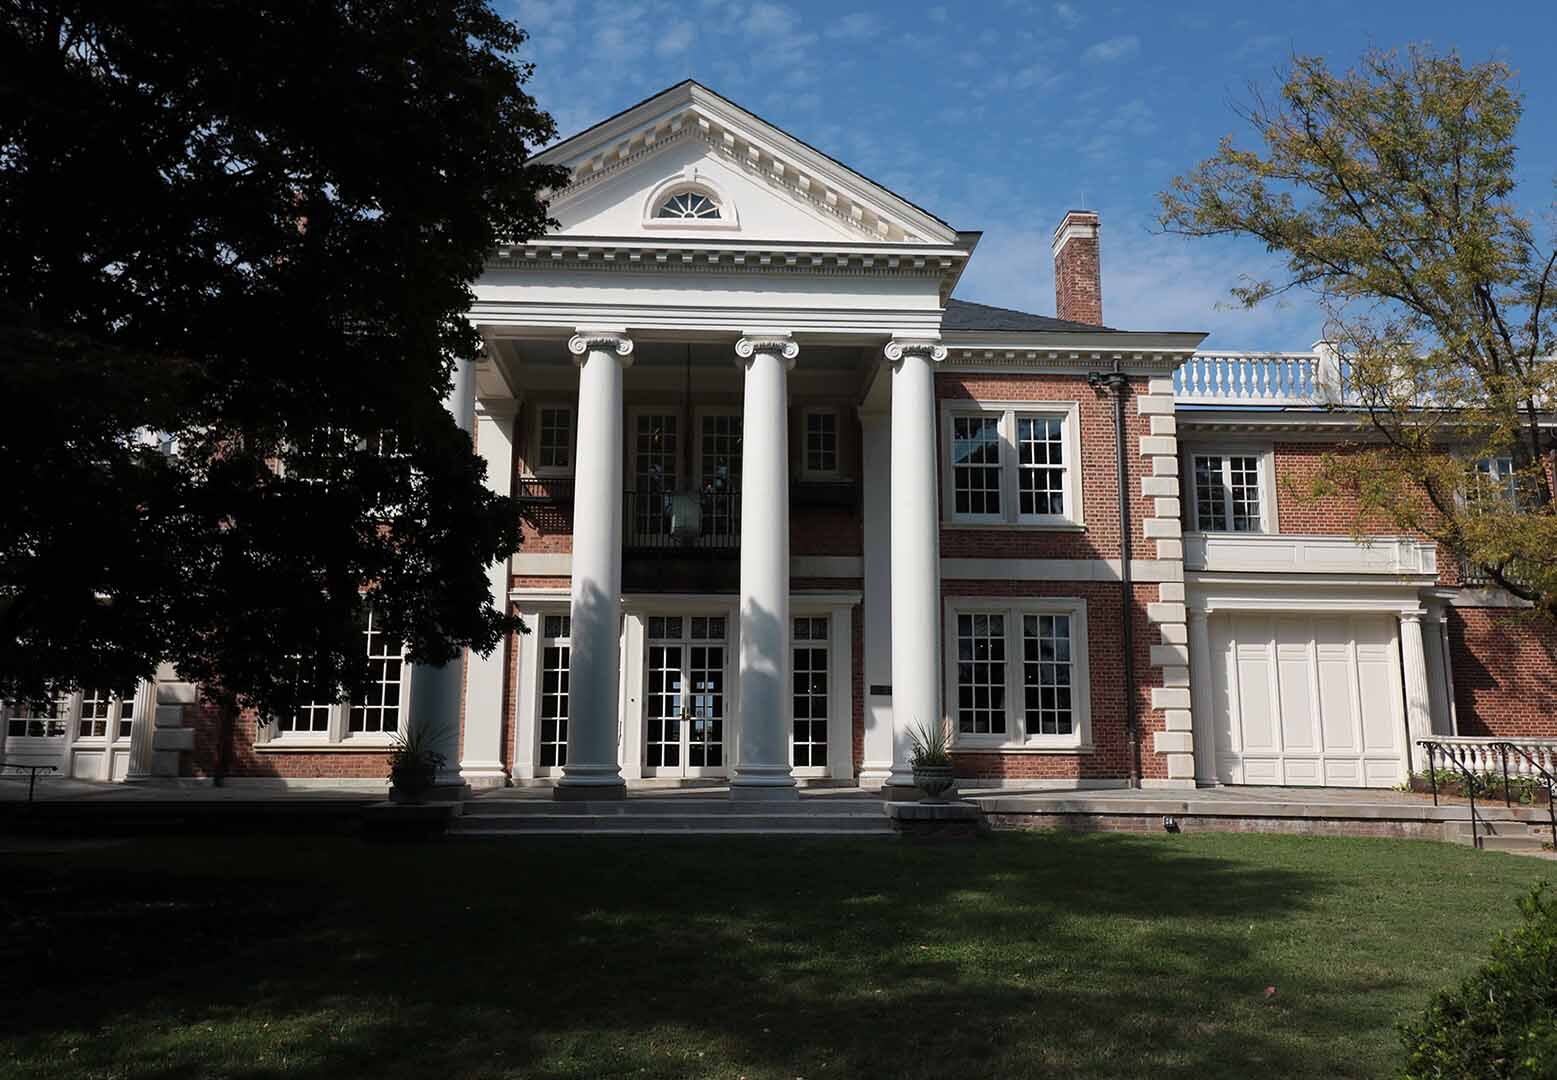
“Charming Victorian Country Garden Retreat” measures 12 feet high, 18 feet long and 30 inches deep.

4. How much paper did you use to make this sculpture?
That is a difficult one to calculate. I will have to get back to you on that one.
5. How did you get the full installation to the Mansion at Strathmore?
I created everything in smaller sections and individual pieces for two reasons. First, it was easier to transport. I also wanted each item to be saleable so it could be sold as one large installation piece or as individual pieces. I rented a truck to take the larger pieces to Strathmore on the first day, and then on the second day, I took all the furry critters in the car. The pets seemed to like the drive because I didn’t hear a peep out of them the whole way down! You can read more about the journey on my blog here and here.

6. Is the entire installation really made out of paper?
Yes, everything you see in “Charming Victorian Country Garden Retreat” is made out of paper. I used a variety of different types of papers. Some are very thin papers and some are thicker papers. The paper siding and painted brick walls are attached to a narrow wood frame, using the same concept that an oil painter uses when they attach their canvas to a frame.
The flower stems are paper covered wire so they will stand up straight and tall. Originally, I thought I would try to make the flower stems out of paper too, which I have successfully done in the past, but I quickly realized it would take too long to make that many paper stems for all the flowers I needed for this installation. It would have added a couple more weeks or months to the project of this size. So, I covered the wire stems in paper.

7. How many flowers are there total in the installation?
There are 80 wisteria flowers, over 75 tulips and more than 100 roses. The rose trellis has over 75 roses.

8. How long does it take to make one paper sculpture wisteria flower?
It takes approximately 2.5 hours to make each wisteria because there are so many petals to one flower and each petal is attached individually to the stem.

9. Is the grapevine wreath really made out of paper?
Yes, even the grapevine wreath is hand-sculpted using painted papers.

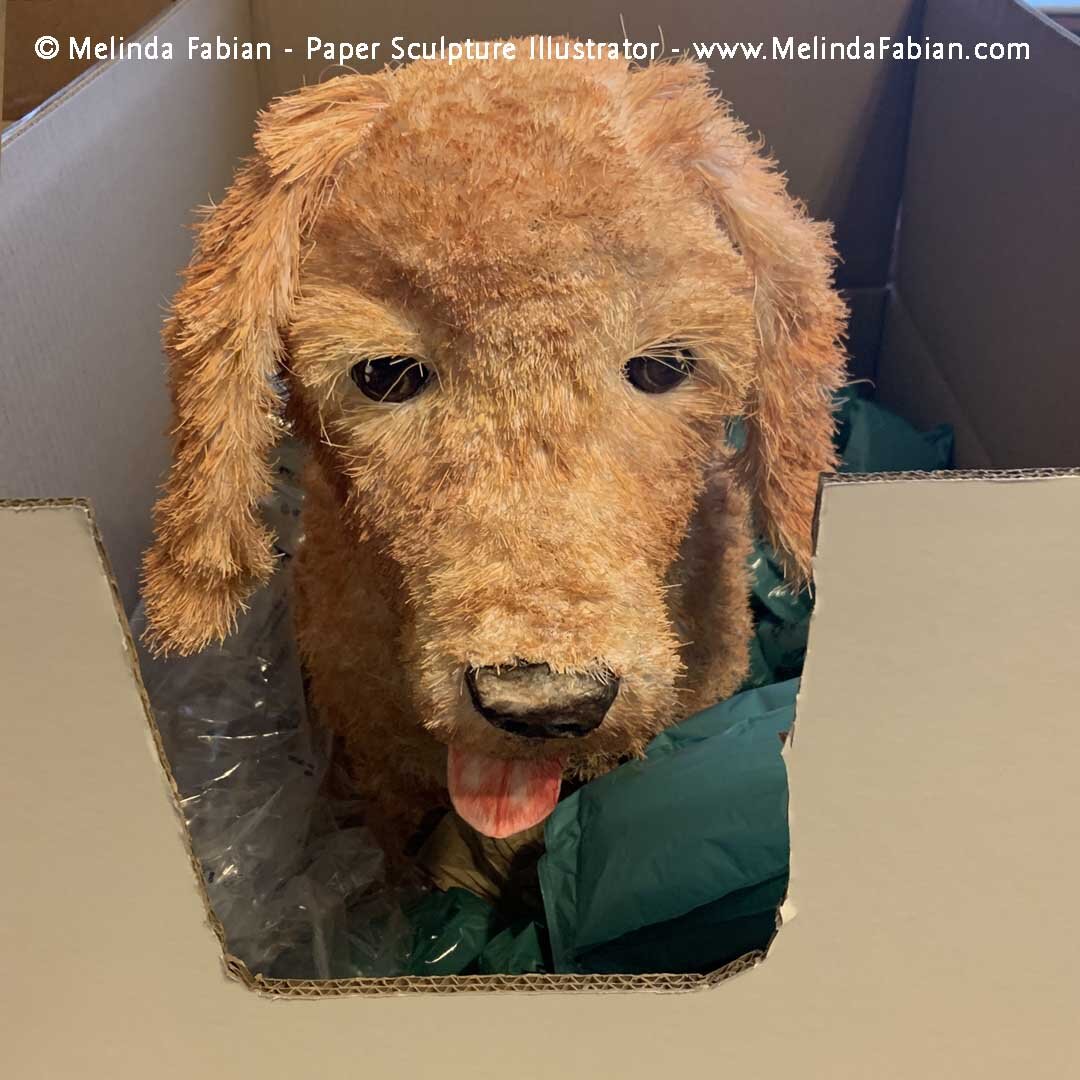
10. How long did it take you to make the large dog?
It took me about 5–6 weeks to make the large golden retriever, Rusty. All of my furry animals are made out of paper. There is no wire armature or structures hidden inside their body. I bend, fold, cut, twist the paper into the necessary shapes to create the skeletal and muscular structure for each animal.
I want to keep these signature pieces authentic and made entirely out of paper and paint, with of course some adhesive to hold the sculpture together. The animals are all very sturdy. Rusty weighs about 10–15 pounds! Each animal is made out of the finest art papers that are then painted in watercolor and gouache.
11. What is your favorite type of paper sculpture to make?
I really like making a variety of different things, but my favorite would have to be the furry animals. I like the challenge of creating fur from just paper and getting the paper sculpture to a life-like appearance. One of my favorite critters in “Charming Victorian Country Garden Retreat” is the last one I made — the little bunny rabbit.

12. Is any of “Charming Victorian Country Garden Retreat” for sale?
Yes, absolutely! The entire installation is for sale as one piece and each individual item within the installation is for sale as well. I also have individual framed pieces available for sale or you could order a piece or purchase a commission. If there is something you are looking for, you can find my contact information here.

There’s still time to see “Charming Victorian Country Garden Retreat” in person at the Mansion at Strathmore, now through Oct. 31. To learn more about planning your visit, head here.

Capturing a Moment in Time
When I was thinking through what I wanted to create for my large-scale paper sculpture exhibit for the Mansion at Strathmore, I felt I had to take a step back and first think about the guests that will view my art.
When I was thinking through what I wanted to create for my large-scale paper sculpture exhibit for the Mansion at Strathmore, I felt I had to take a step back and first think about the guests that will view my art. What did I want them to see? What feeling do I hope to evoke when they view my artwork?
When I am at a museum looking at art, I like the feeling of being drawn into a piece, taking a step closer to get a better look to examine something special in that piece. Perhaps it is the colors, the brush strokes, the details or the subject matter or the emotions.
For my large-scale paper sculpture illustration exhibition, I wanted viewers to feel happy, excited and have some fun with my art. I want to draw people in by adding tiny elements and details I love to include in all my work. I want visitors to stay for a bit, so they can enjoy the space, feel part of the scene. I want my paper sculpture to be so real viewers feel like they’re seeing real wisteria, hearing baby birds chirping, getting ready to eat yummy desserts and watching a ladybug climb up the tulip petal.

I realized I wanted to capture a moment in time. In our busy world, how can we slow down and take a moment to appreciate what’s around us? That’s what I wanted to accomplish in my paper sculpture.
We often miss little moments in our everyday life. As a child we may have noticed the colors of the flowers or caught the squirrel scurrying away or the ants marching along the path. These moments keep happening around us, but they’re easy to miss and take for granted. Even watching the family cat playing with string or the color of the dog’s fur in the evening sunlight.

In my “Charming Victorian Country Garden Retreat,” I’m asking you to pause, take a look and remember just how much beauty can be found in many moments in our lives. It is exactly these little moments that add up over time and are really important. The whole world is exciting and new and we don’t have to go far — it is right there in front of us, and often best enjoyed with those we love the most.

I have always wanted people to feel joy when they view my art and hopefully they can also have some fun while looking at the entire piece. I want to use my art to strengthen family bonds, from young children to parents and grandparents, sharing in an experience created through my work — bringing families together with my art.

Come and visit my art at the Mansion at Strathmore, in person or online. Look closely and tell me, what can you find? What memories does it remind you of when you see it? Perhaps the next time you are outside at the park or on your own front porch, enjoying a cup of tea, you may look up and hear the birds chirping and notice the little chipmunk at your feet, eating the acorns that fell from that large oak tree. So smile and enjoy this moment in time!


Critters Are Moving to the Mansion at Strathmore
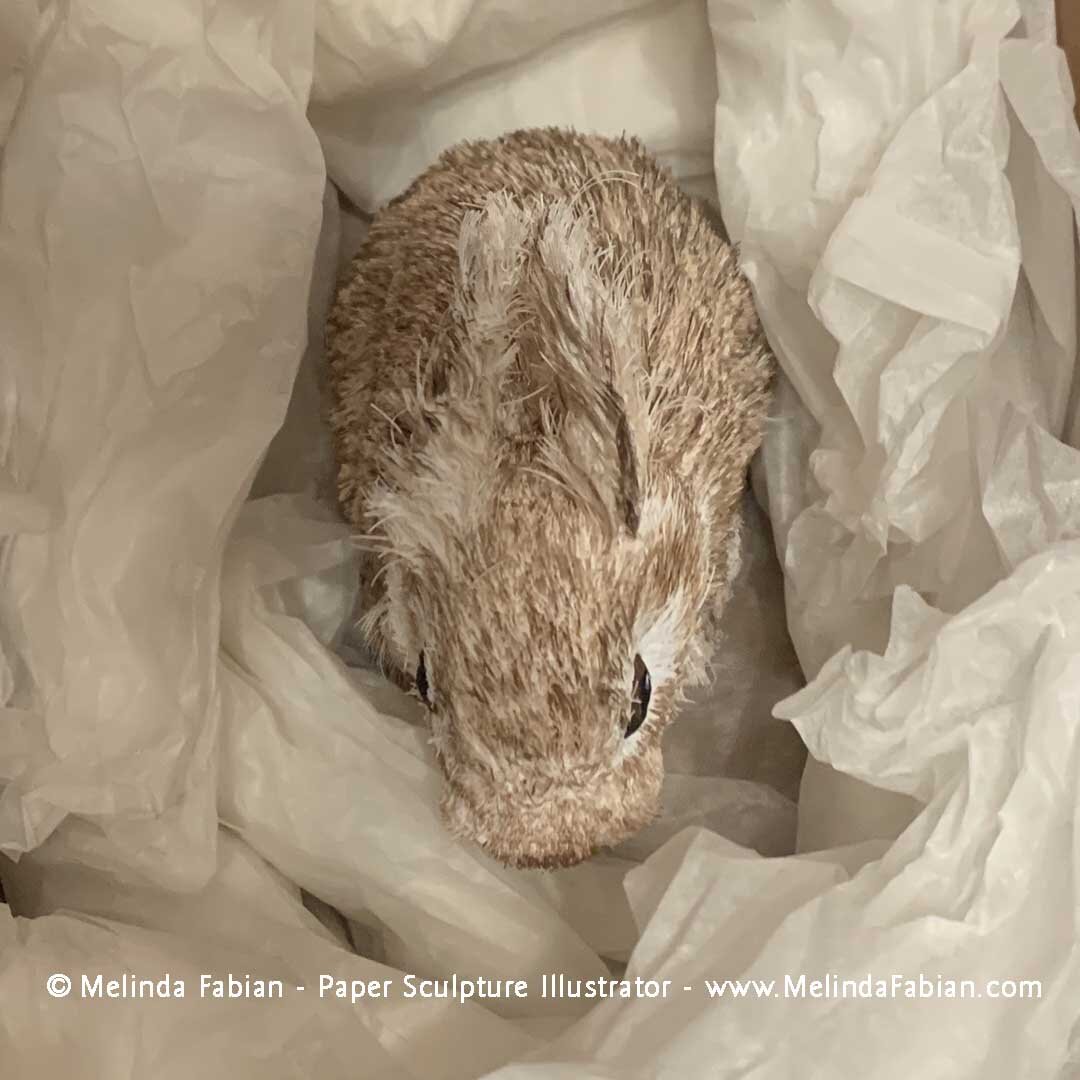
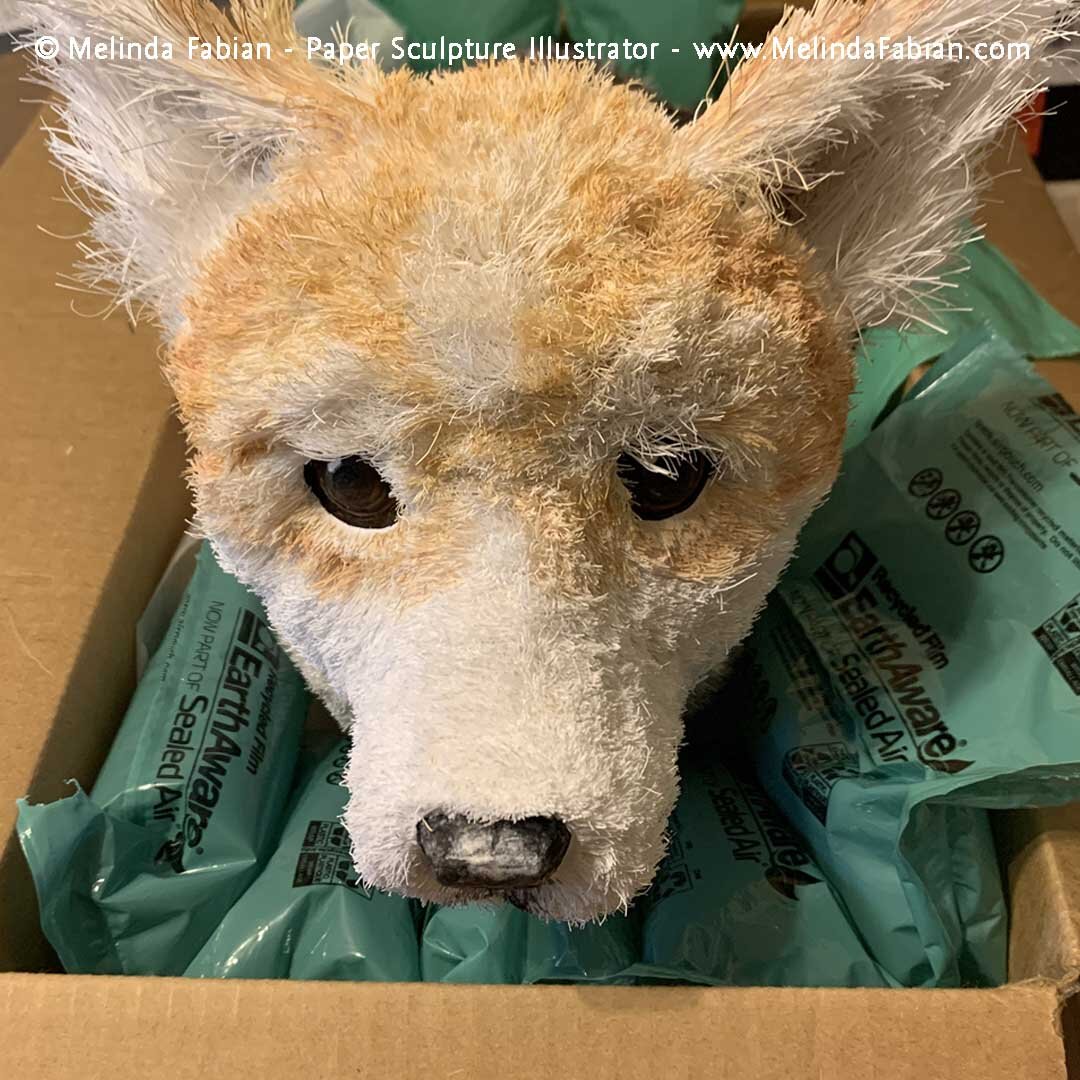
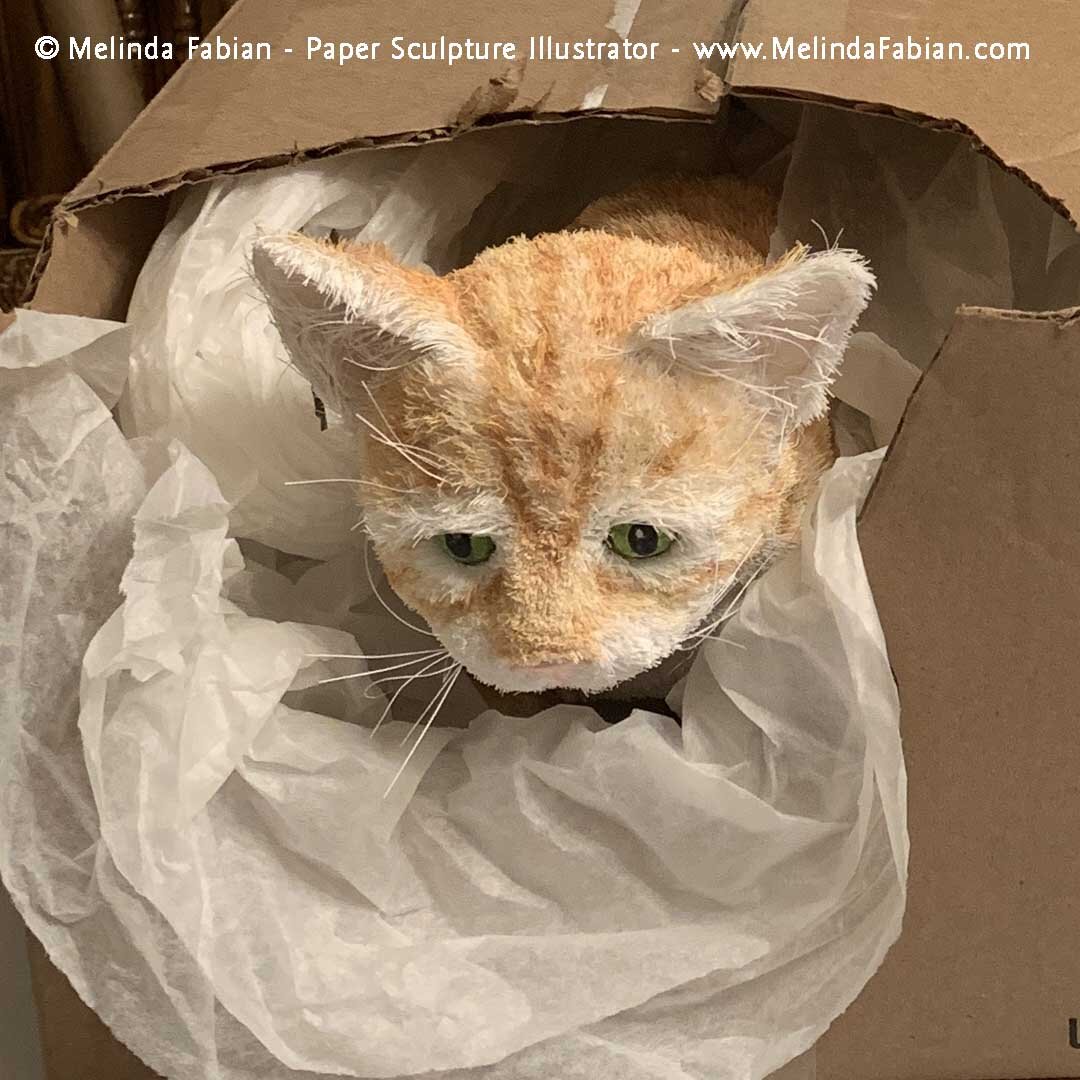
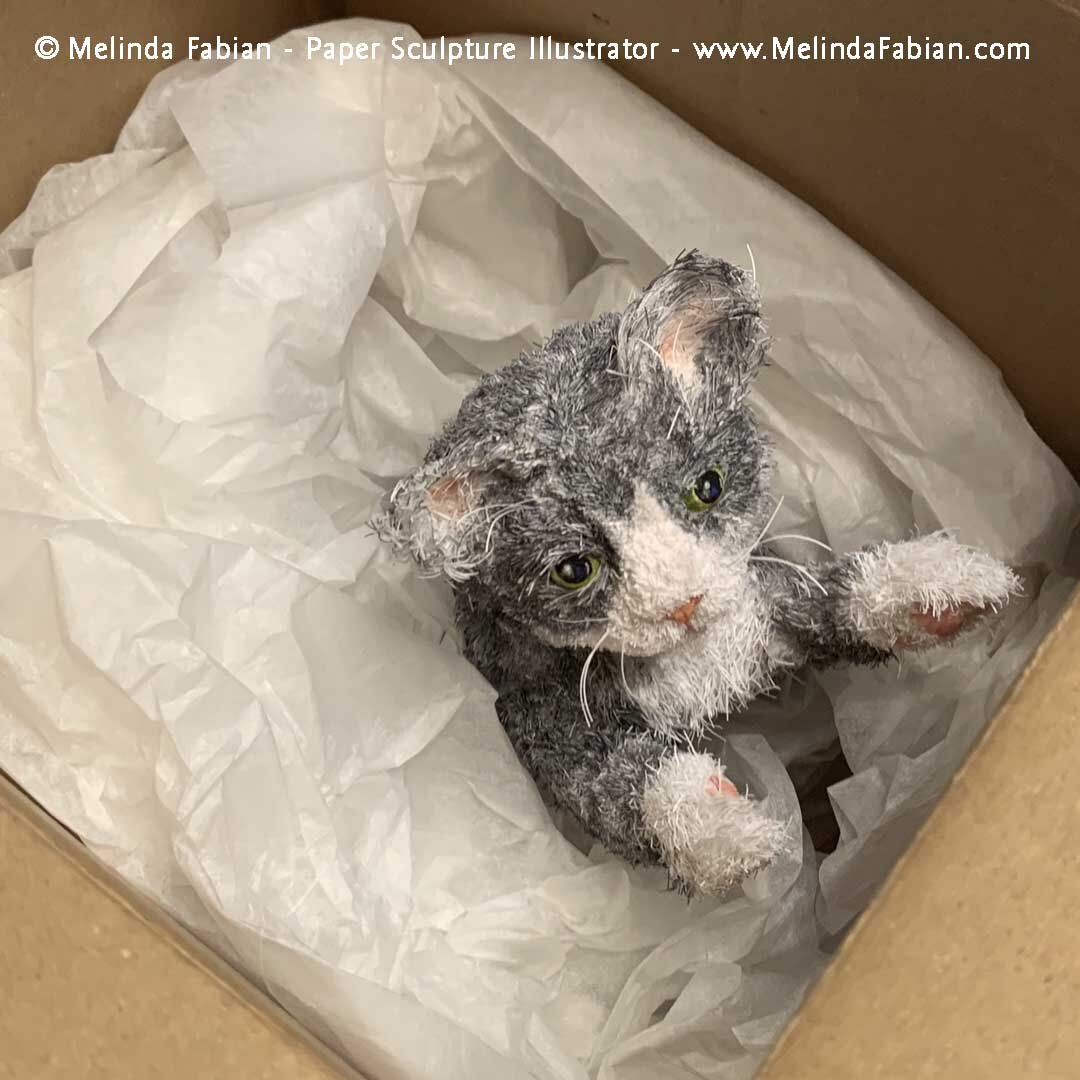
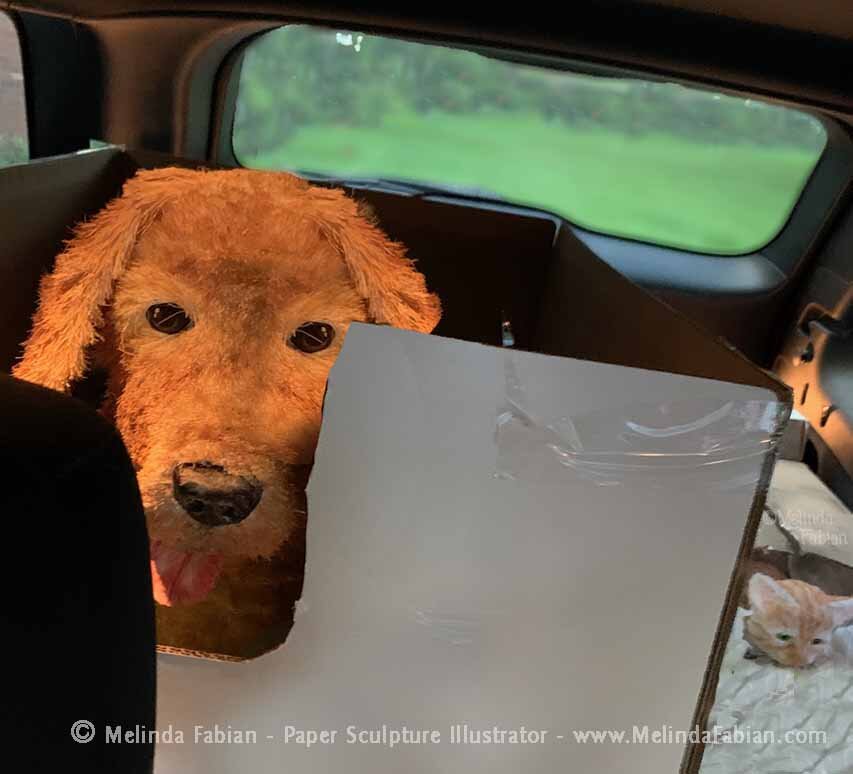
Because my paper sculpture animals are more fragile than many of the other pieces going into my large-scale installation, I wanted to take them separately.
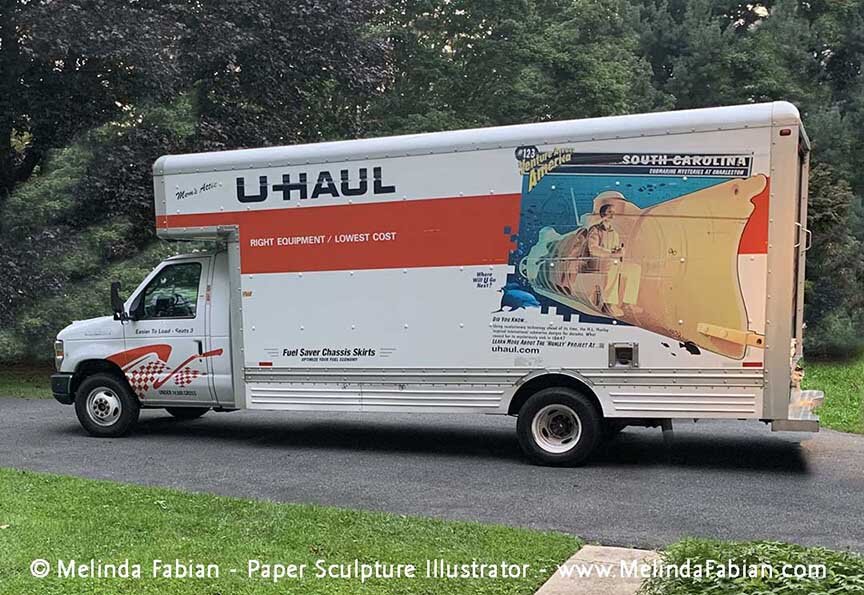
On my first installation day, I rented a truck to take the large paper sculpture items for my “Charming Victorian Country Garden Retreat” installation to the Mansion at Strathmore. On the second day, it was time to take the critters to the mansion.
Because my paper sculpture animals are more fragile than many of the other pieces going into my large-scale installation, I wanted to take them separately and not risk them being jostled around too much in the back of the truck.
To pack up these cute furry, handmade, hand-sculpted, critters, I needed to figure out a way to pack them safely without altering their appearance — such as the cute little nose on the bunny rabbit or the fluffy tail on the squirrel.
It seemed like the best way to pack up these cuties was to make a little nest for them to sit in. Using acid-free tissue paper, I carefully made them nests. I didn’t want the whiskers on the cats to become damaged, so I let their little faces stick out of the boxes just like they are sitting in a pet carrier. Well, like the most well-behaved cat ever sitting in a pet carrier.
They looked so cute all wrapped up in their boxes and packed up inside my car – all ready to travel to The Mansion at Strathmore in Bethesda, MD for installation day No. 2!

On My Way to the Mansion at Strathmore
Today’s story begins near the end of my process. The work in my studio is completed, and my installation is about to leave my studio and make its way to the Mansion at Strathmore.
For over a year, I’ve been working on a large-scale project for the Mansion at Strathmore in Bethseda, Maryland. I was asked to be a part of the Paper Works show. My installation, “Charming Victorian Country Garden Retreat,” is 18 feet long, 12 feet high and 3 feet in depth. In the past, I’ve created booth designs for trade shows and for art shows, but this is the first installation I have ever done out of paper at this size. It has been a new experience and I am excited to share with you some of the steps I went to in order to create a successful installation.
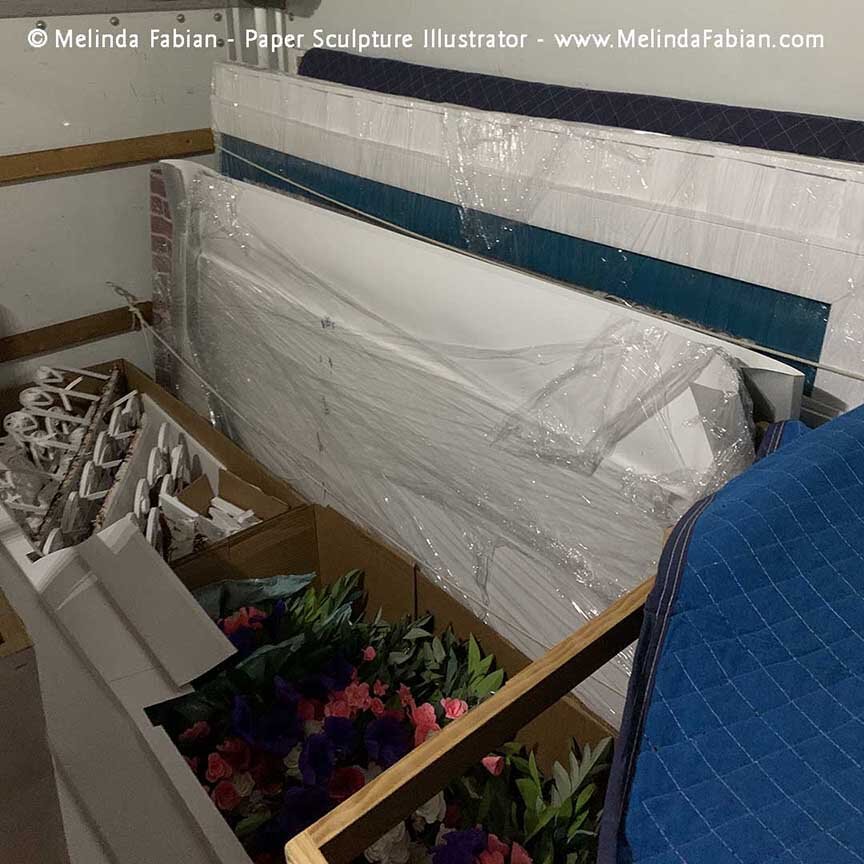
Today’s story begins near the end of my process. The work in my studio is completed, and my installation is about to leave my studio and make its way to the Mansion at Strathmore. Because it is such a large installation, I purposely designed the entire piece in small pieces and manageable sections that will all come together into one large scene. Some of the sections though are still too large to transport in my car, so I had to rent a truck. The largest sections of the piece are 7 feet high by 4 feet wide, though are all lightweight. It may be easier to transport, but there are a whole lot of pieces.
It took a full day of packing to everything ready to go, including extra papers just in case something tears, breaks or creases and needs to be repaired. I used many different types of papers to create the installation so that alone was a lot to take along. I try to be prepared for the worst-case scenario and hope for the very best. I also needed to pack up the tools I use such as glues, scissors, adhesives, and whatever else I could think of that could possibly help me construct the final installation. The Mansion is about 1.5 hours from where I live, so I needed to be prepared because I could just run home.
We loaded most of the truck in the evening and then first thing in the morning, drove to Bethesda where everyone was waiting for us. We had some extra hands to help get everything in place and complete the installation. I was so grateful there were people there to help us unload the truck and to help us to begin installing everything. In total, it took us four days to complete the installation and add all the final details. Stay tuned for more behind-the-scenes scoop on “Charming Victorian Country Garden Retreat.”

Opening Day for ‘Charming Victorian Country Garden Retreat’
This is the moment I’ve been waiting for, Sept. 8 2020! Today is opening day of the show “Paper Works: The Art of Paper” at the Mansion at Strathmore in Bethesda, Maryland.
This is the moment I’ve been waiting for, Sept. 8, 2020! Today is opening day of the show “Paper Works: The Art of Paper” at the Mansion at Strathmore in Bethesda, Maryland.
My 18 foot long by 12 feet high exhibit titled, “Charming Victorian Country Garden Retreat,” is featured in this amazing show at Strathmore. I am so honored and thrilled to be a part of the show.
After working on this piece for 1.5 years, it is so exciting to finally see my installation all come together into one large-scale exhibition. I built the paper sculpture art in small sections, so to see it all pulled together as I had conceptualized it after so long is really something.
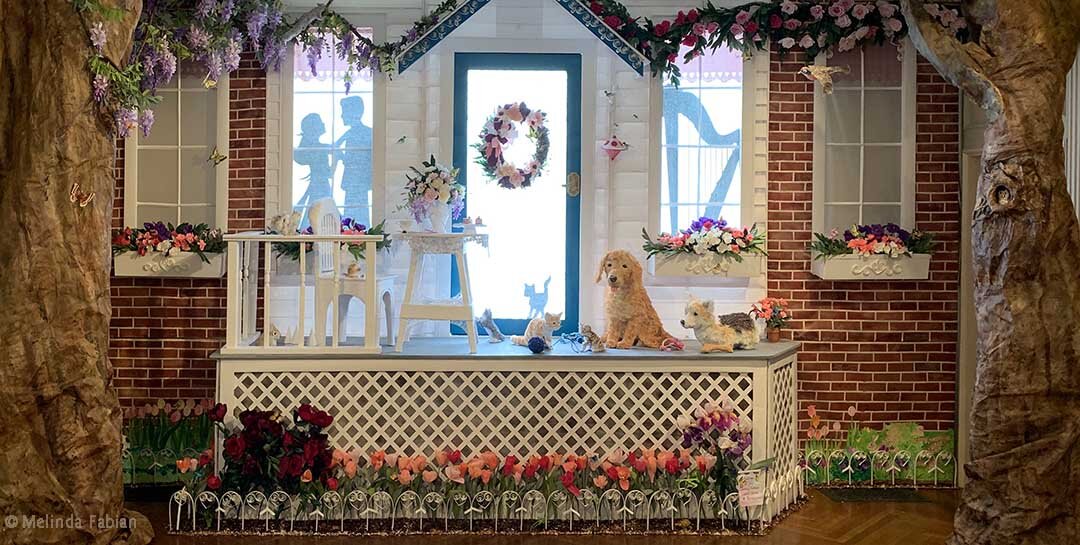
The installation is made out of paper, from the painted brick walls, to the white paper siding, wicker table and chair and of course all the furry critters that have become a part of this retreat. I hope my art helps to remind us the importance of enjoying the simple moments and joy we can find when we retreat into these moments.
In this exhibit it may be the chirping of the baby robin or watching the playfulness of the kitten or corgi playing on the porch. And if you look closely within this setting, in this habitat, you will find ladybugs, butterflies, cocoons and a praying mantis to name just a few — all the things that enrich the habitats we find ourselves in every day.
I can’t wait to show you my work. You can get a sense in the photos below. Plus, over the next several weeks, I will be blogging about the process and include some behind-the-scenes videos and photos. Please keep checking back for more.
I would also love for you to see “Charming Victorian Country Garden Retreat” in person. For information about visiting, check out the show’s official page on the Strathmore website here. And don’t forget to join us for a free virtual art reception on Thursday, Sept. 17 at 7 p.m. ET.


For Immediate Release
Melinda Fabian’s 18-foot piece will be the focal point of Paper Works: The Art of Paper at the Mansion at Strathmore.
Local Artist’s Paper Sculpture Country Garden Retreat Featured in Strathmore Gallery Show
Melinda Fabian’s 18-foot piece will be the focal point of Paper Works: The Art of Paper at the Mansion at Strathmore
BEL AIR, Md., Sept. 8, 2020 — Local Bel Air, Maryland, paper sculptor and illustrator Melinda Fabian will be the featured artist at a new exhibit opening at the Mansion at Strathmore in North Bethesda from Tuesday, Sept. 8 through Saturday, Oct. 31. The show, Paper Works: The Art of Paper, brings together 11 paper artists who use paper as the focal point in their creations, including Fabian’s large-scale paper sculpture installation.
Titled “Charming Victorian Country Garden Retreat,” viewers of Fabian’s 18-foot installation in the Paper Works show can expect an idyllic setting just outside a country cottage that reminds us of a simpler time. The piece is one in a series of Fabian’s habitat sculptures, which capture the simplicity, joy and beauty of simple moments in time often taken for granted.
“While ‘Charming Victorian Country Garden Retreat’ is made out of paper and paint, it is my hope this habitat will remind us of the importance of creating real spaces in our lives that can be our safe haven,” Fabian said of the installation. “I want my work to create an opportunity for viewers to reflect on the healing power in our everyday intersections with nature.”
Visitors to the retreat are welcomed into a serene setting with a beautiful garden framed by wisteria, roses and tulips. The family pets play on the front porch where the wicker table is set with exquisite afternoon snacks. Hidden creatures, like ladybugs, a praying mantis and a chipmunk inhabit the scene for those who look carefully. Fabian’s installation combines hand-sculpted paper elements painted in gouache and watercolor to bring them to life.
Paper Works: The Art of Paper was curated by Lesley Lundgren, Strathmore’s director of exhibitions. Other artists featured in the show include Kate Norris, Ashely Chiang, Gina Gwen Palacios, Daniel Lai, Marylouise Roach, Rosa Leff, Leigh Suggs, Lucrezia Beerli-Bieler, Jennifer Deppe Parker, and Ronni Jolles.
The Mansion is operating with new hours, along with extra COVID-19 safety precautions. Several virtual events will be held throughout the show’s run, so keep an eye on the show’s website. Learn more at https://www.strathmore.org/mansion
About Melinda Fabian, Illustrator
Award-winning illustrator Melinda Fabian creates realistic yet whimsical art designed to bring families together. Melinda’s signature work features paper sculpture designs, which seamlessly blend three-dimensional, hand-sculpted paper elements and watercolor and gouache illustrations to create lifelike scenes. Her imaginative designs literally jump off the page — the swish of a cat’s furry tail or a busy bee’s landing — causing viewers to do a double take upon realizing they’re not just flat paintings. Melinda’s paper sculpture illustrations have won several awards in galleries across the United States. She also created an award-winning line of Can You Find?® hidden object greeting cards, games and jigsaw puzzles as the creative director for the company she previously co-founded, Rocking Chair Studio. Melinda has more than 35 years of experience as an illustrator, freelancing for magazines and publishing companies, and holds a bachelor’s degree in communication design from Kutztown University in Pennsylvania.
About Strathmore
Strathmore presents and produces exemplary visual and performing arts programs for diverse audiences; creates dynamic arts education experiences; and nurtures creative ideas and conversations that advance the future of the arts. The Mansion at Strathmore is located at 10701 Rockville Pike, North Bethesda, MD, one half-mile north of the Capital Beltway and immediately adjacent to the Grosvenor-Strathmore station on Metro’s Red Line. For further information or tickets, call (301) 581-5100 or visit www.strathmore.org.
Contact
Melinda Fabian, melinda@melindafabian.com
###


Supersize Painting for Paper Sculpture Leaves
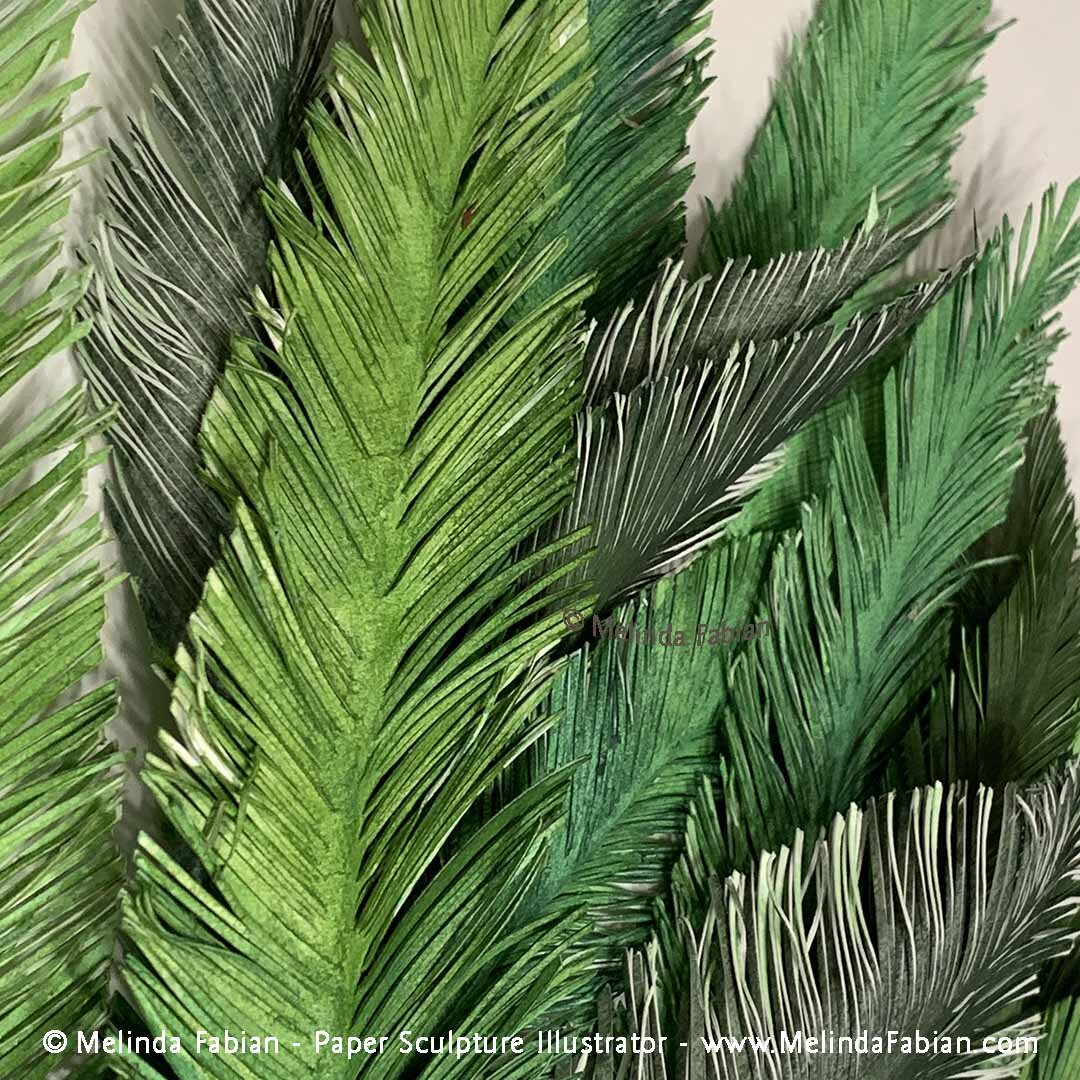
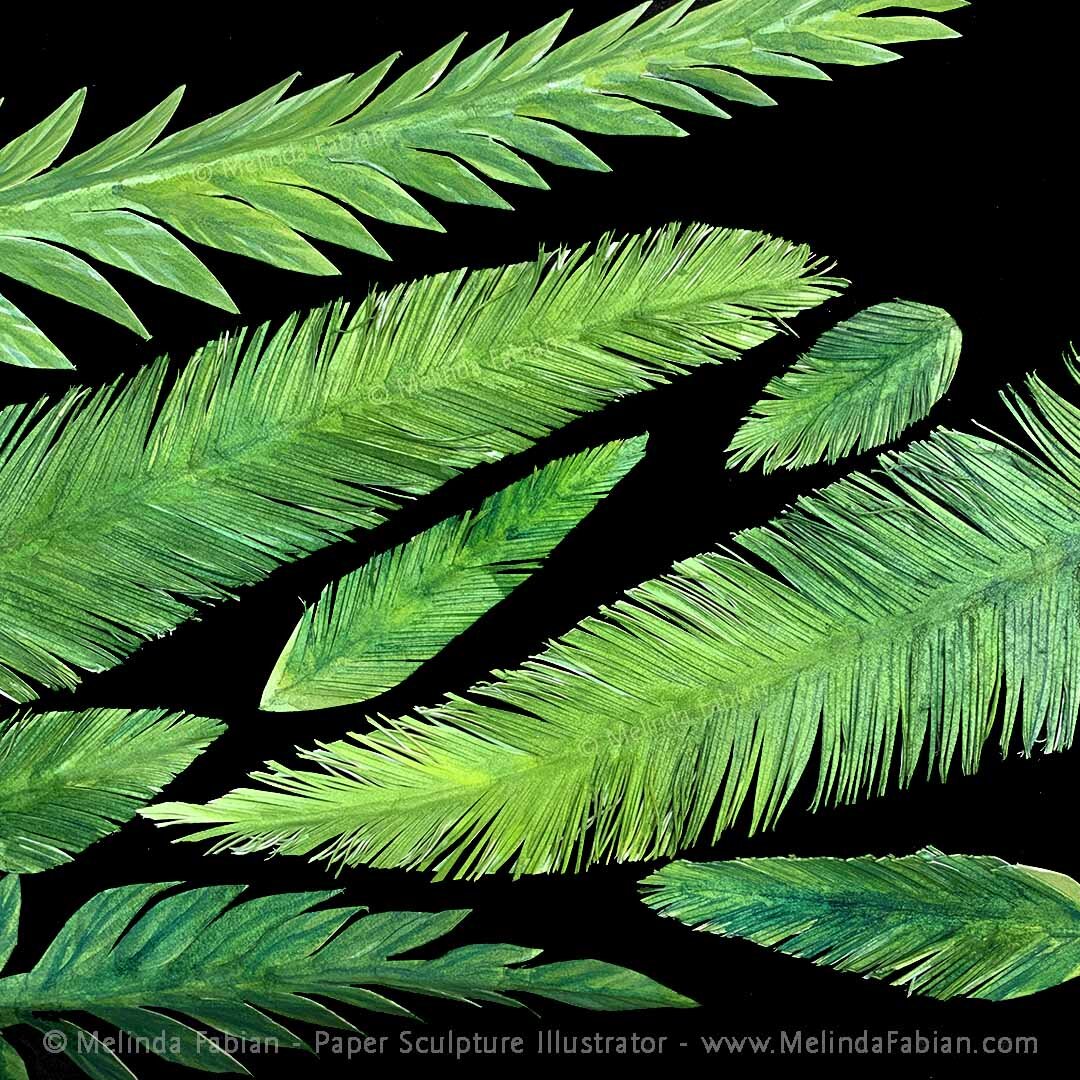
One of the pieces I am making is a large wreath for the front door of my “Charming Victorian Country Garden Retreat.”
For the past year, I’ve been working on many large items for my upcoming art installation. The exhibit, Paper Works, will be held at the Mansion at Strathmore in Bethesda, Maryland, Sept. 8 through Oct. 31. For the show, I am working on the largest piece I have ever done. There are lots of furry critters, birds and all sorts of surprises within the exhibit.
One of the pieces I am making is a large wreath for the front door of my “Charming Victorian Country Garden Retreat.” It is going to be a grapevine wreath with a variety of pretty flowers and leaves and a beautiful bow — all made out of paper. I am making all the pieces separately before I start attaching them to the wreath.
Since I will need to make a lot of leaves, I wanted to mix up a large amount of watercolor paints at one time. The only paint trays I had were these small watercolor trays with individual cups with lids. I really like these trays, but since I need a lot of paint, someone suggested I could try canning jars.
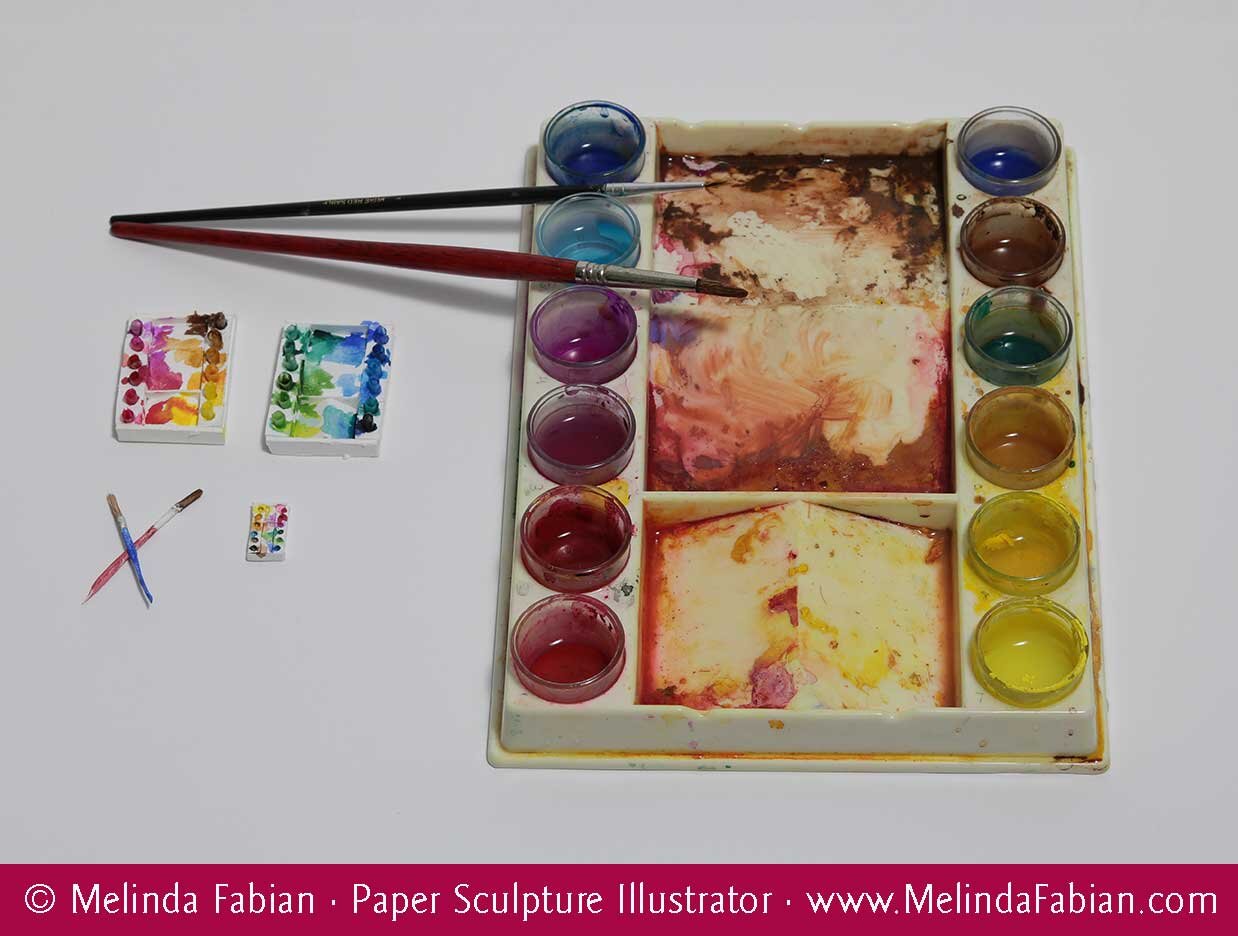
I used the jars a few months ago to mix up the paints I needed for my paper sculpture dog, Rusty, and it really worked out well. The other nice thing about using canning jars is that it is so easy to mix paints. I add various colors to the jars, put the lid on tightly, and give it a good shake. Open it up and test the out the color and decide whether it’s good to go or it needs another mix.

I use watercolor and gouache paints, so it takes more paint than I am used to using for my smaller paper sculptures — and big brushes too! It was fun mixing up the colors and slathering watery paints onto large sheets of papers.
To show you the final product, here are some of the leaves I’ve been painting up in my studio. Hopefully I will have enough leaves already, but if not, I can easily make more. I still have paint left over to make sure they will be the same shades of greens.


Creating a Full-Color Can You Find?® Seahorse
When creating a Can You Find? hidden object picture in full color, hiding objects is similar to hiding them in a black-and-white drawing.
When creating a Can You Find? hidden object picture in full color, hiding objects is similar to hiding them in a black-and-white drawing. What shape is the object and where can I hide an object that has a similar shape? What type of texture can I add to the image to help hide a hidden object so that it all makes sense to the entire image?
Sometimes with a full-color hidden object picture, you have to keep in mind the colors of the objects will give away a clue to the viewer as to where to look for the hidden objects. The seahorse illustration is a good example of this. Looking for the color of the object — like the pink in the horseshoe or purple carrot top — can be a helpful hint in finding the hidden objects.

The hidden cat shape in the seahorse illustration often has people searching for quite some time before they are able to find it. I think the reason this object is more difficult to find is because it is hidden in negative space in the illustration. The space between the coral not on the coral itself which is why that blue space is called the negative space — the shape created from the lines of the coral.
Creating Can You Find? illustrations is always one of my favorite types of projects to do — they don’t get old even after decades of creating new puzzles in black-and-white and color. Plus it’s always a fun challenge to see what new objects I can hide next.

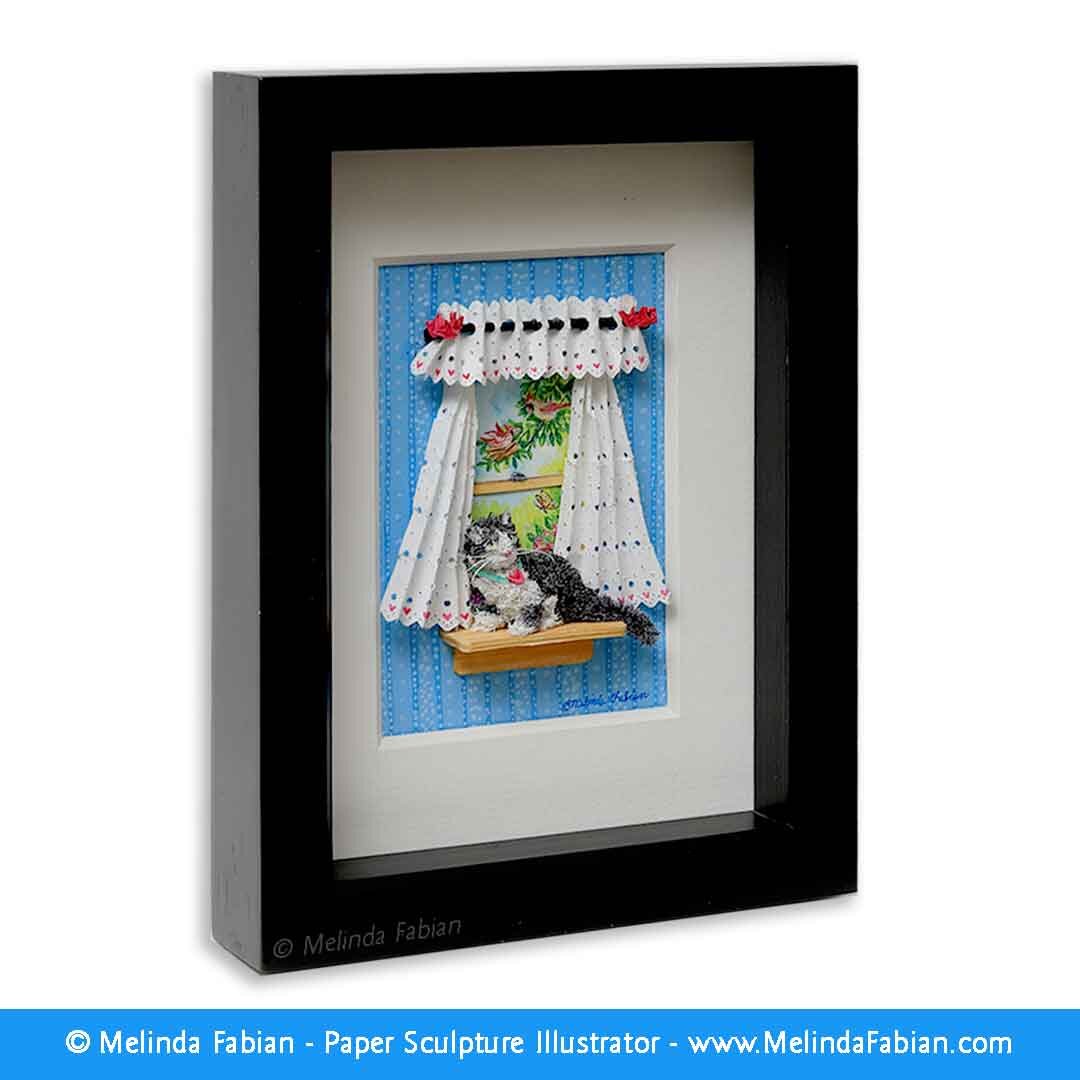
The Real Cat Supermodels Who Inspire My Work
Here’s just a few of the illustrations and paper sculptures where my supermodels were the inspiration. See if you can match the illustration to the cat!
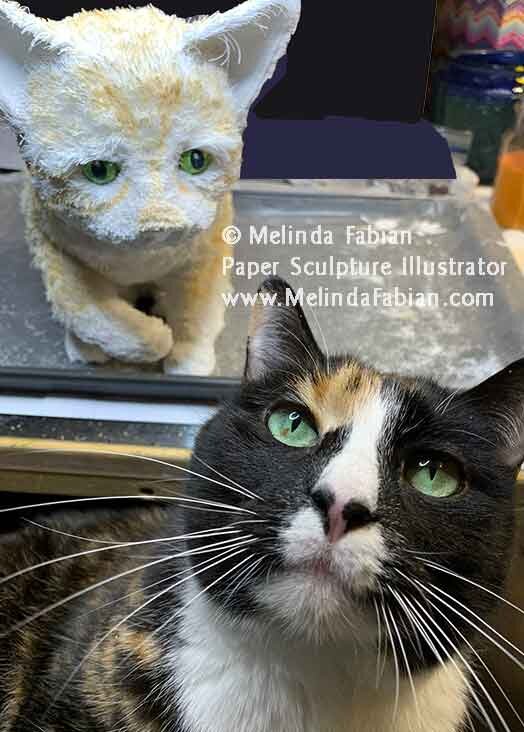
Did you know that I use supermodels for some of my paper sculpture reference materials? Yes, that’s right, and I would like to show you some of the most famous models you’ll see pop up in my work right here.
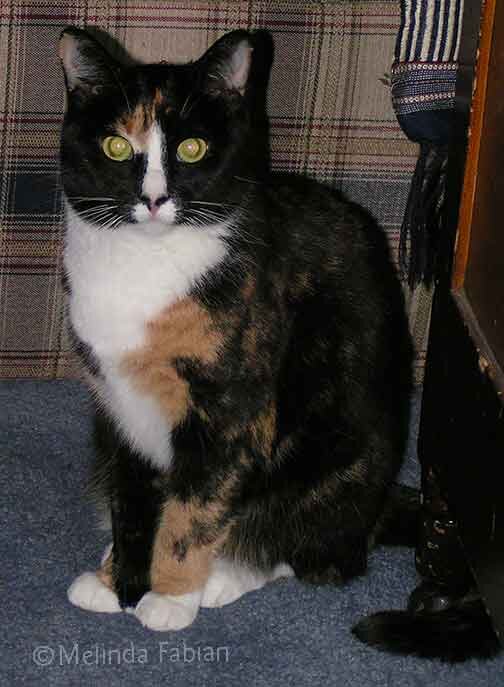
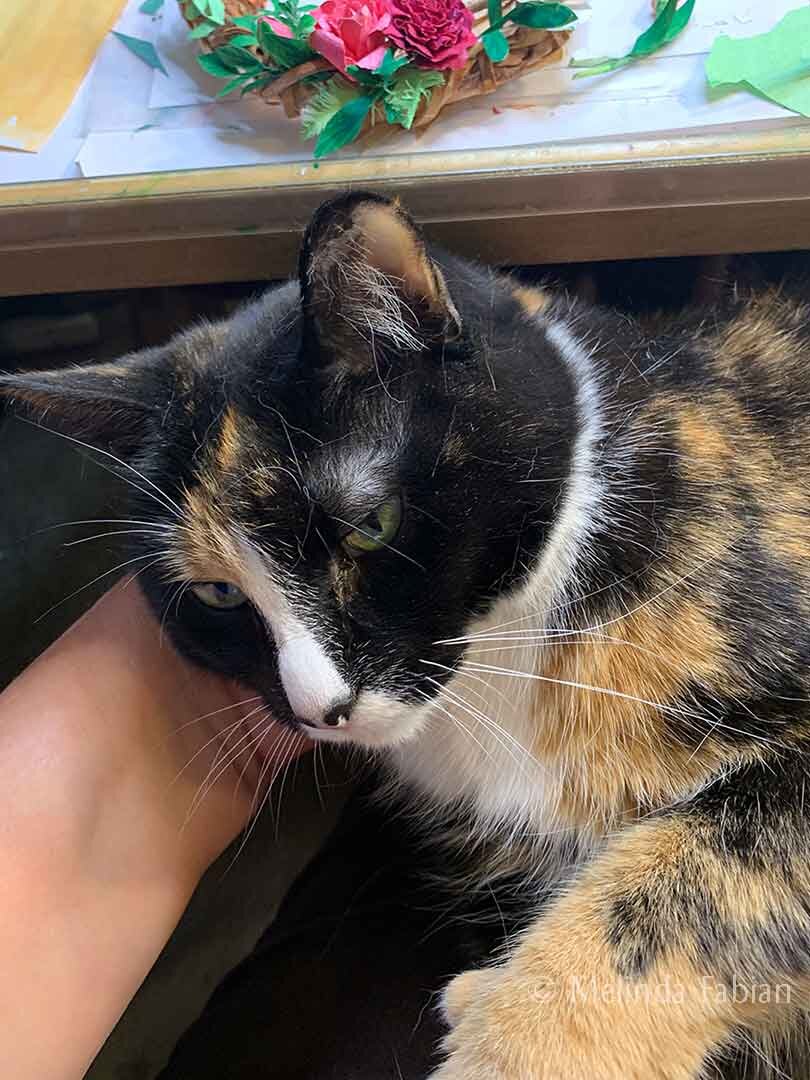
First, we have Molly. An adorable calico cat who looks more like a large kitten than an adult-sized cat who is about 10 years old. She is polydactyl and has extra toes on her front paws, which just adds to her cuteness. I call her my studio cat.
She loves to come and check up on me first thing in the morning and throughout the day. She also loves to distract me and insists I stop working and let her sit on my lap while she purrs loudly. Honestly, it’s always a nice distraction for both of us. When she’s not “assisting” at my desk, she keeps me company curled up in front of the fireplace or sitting by the windows.
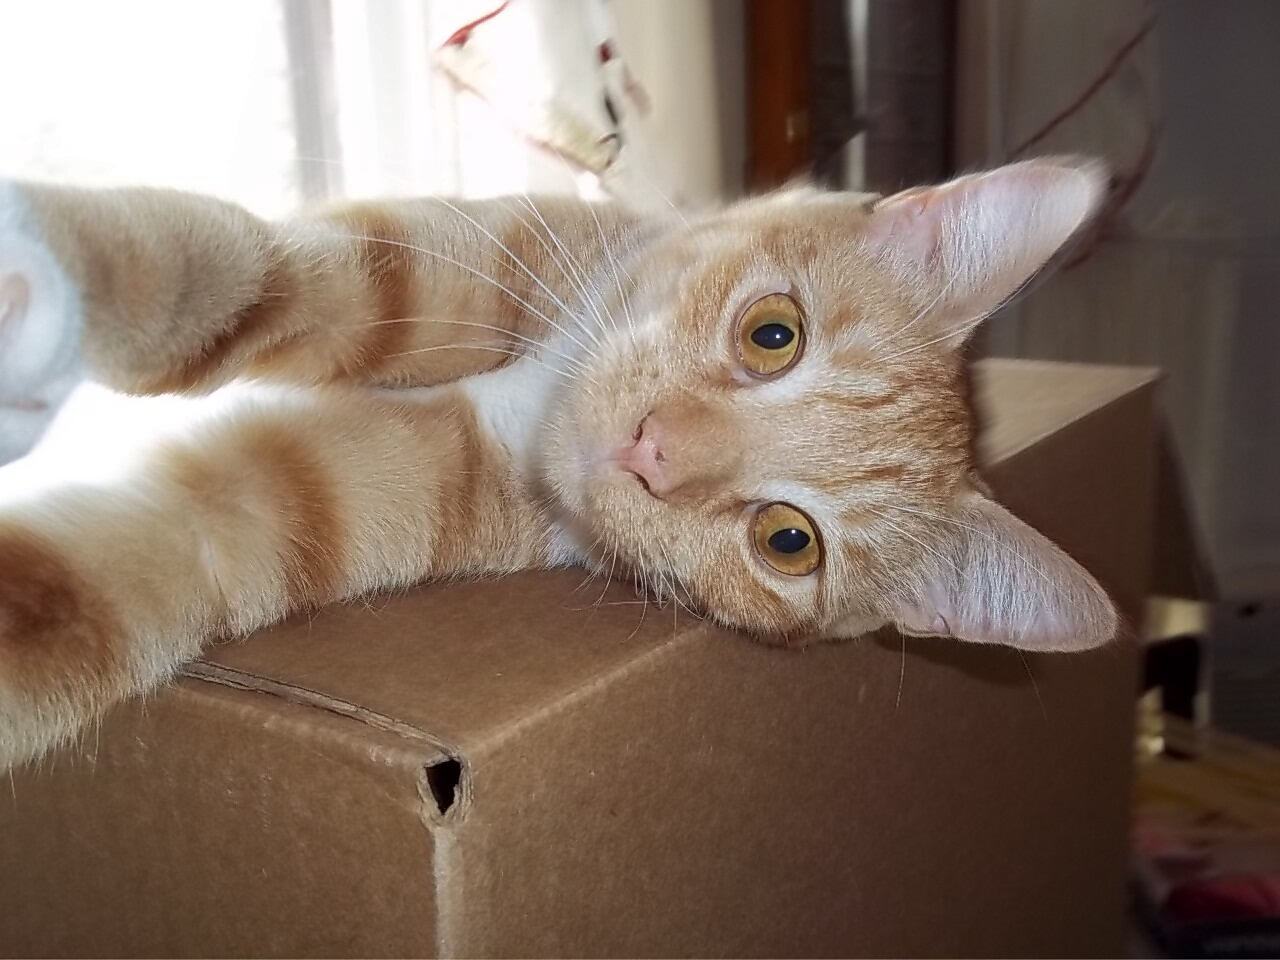
Next up, we have Tube Socks, the biggest orange tabby in the group of supermodels. He got his name because when he was a kitten, the stripes on his front legs looked like he was wearing tube socks — those white gym socks with the colored bands at the top. The dark orange stripes on his legs have faded somewhat with age.
We have nicknamed him a puppy cat because he follows my husband around the house. At night, Tube Socks will meow and meow, until he hears us say, “Goodnight Tube Socks!” Then he curls up and goes to sleep. How cute is that?

Next we have Peanut and Cricket, orange cats, who, along with Tube Socks, are brothers. They live with my daughter in Los Angeles, now big-time city cats in Hollywood. Cricket most recently posed for my furry cat that will be included in my installation during the Paper Works show at The Mansion at Strathmore this summer.

I often refer to our cats when I need to check out their eyes, ears, facial features or stripe patterns. They’re great live reference materials when I need to paper sculpt a cat and get their tricky features just right. Our cats make really great models. Here’s just a few of the illustrations and paper sculptures where my supermodels were the inspiration. See if you can match the illustration to the cat.


Hiding Objects in a Can You Find? Hidden Objects Illustration
Ever wonder how artists hide secret objects in their illustration work?
Ever wonder how artists hide secret objects in their illustration work? I’ve been illustrating hidden object puzzles for decades, first for Nature Friend Magazine and then with my own line of Can You Find? illustrations, which won several awards. Take a closer look at how six objects came to be hiding among this squirrel.

The first thing I do is sketch up a bunch of thumbnail sketches with my ideas so I can get the design and composition of the illustration figured out first. Sometimes as I am drawing up the illustration, I will decide that I want to hide an object in a certain area because, as in this case, I like the texture of the object and I think it will be an interesting place to hide something. I knew the acorns could make a good spot for a hidden object.
After thinking about the texture of the cap of the acorn, a turtle shell came to mind because of the texture of his shell. With the shape of the turtle shell and the acorn cap, I could draw that into a camouflaged turtle. Before I even consider doing the final art, whether it is a black-and-white line illustration or a full-color illustration, I must know exactly where the hidden objects are going to be drawn.
If I used wavy lines to indicate bark on a tree branch, I was able to use that texture on the tree branches to my advantage to easily hide a banana and a bird. The delicate, lighter-colored veins on the oak leaves became another area I wanted to hide some objects. I chose a small mitten in the lower oak leaf at the bottom of the page. I also hid a green pear on the right side of the page.

Behind-the-Scenes of Creating a Hidden Objects Illustration
I have hidden literally thousands of tiny objects in my illustrations.
I have created hundreds of hidden object pictures over the years. I used to draw a monthly hidden object illustration for Nature Friend Magazine. I also produced puzzle pages for Pockets magazine, greeting cards, jigsaw puzzles, and other children’s publications. I illustrated a line of “Invisibles Sticker Books,” which include my signature hidden object puzzles. I’ve hidden literally thousands of tiny objects in my illustrations.

But, everyone in my family has also assisted me many times with these hidden object illustrations. My husband is an expert at hidden object puzzles. He once had to find over 350 objects in my illustrations — twice — all in the same night! Yep, you read that correctly. I blame deadlines.
What happened was I was working on deadline and in order to double-check the final art, I needed to have someone look over the work with fresh eyes. After working on the illustrations for long periods of time, drawing all those lines and hiding all those objects, your eyes get a little tired. I need an assistant to help me double-check my work and make sure all the objects are hidden where they should be.
The good news is, my husband has so much Can You Find? practice, he is also now an expert at finding all the things I lose around the house. As he likes to remind me, “Living with you is like living in a giant Can You Find?” He is great at finding my phone and keys, which is perfect, because I am good at misplacing them.

When my children were young, they got in on the action too. When I was drawing monthly hidden object puzzles for Nature Friend Magazine, I would often ask them what I should draw next. Then inevitably, I would ask them what I could hide in the final illustration. After all, I couldn’t hide a banana or screwdriver in every piece. It was always refreshing to see my work through a child’s eyes. But, as it happens when kids get older, it was harder to rope them into my studio.
My Can You Find? line of illustrations were published on greeting cards, puzzles and games and won several awards. My “Invisibles” hidden object books, come in a variety of themes. Some even have stickers. They’re available for purchase through Milestone Books.

How It's Made: Can You Find?® In Black and White
Hopefully this will give you a small insight as to how I go about drawing up one of my Can You Find? illustrations.
Over the years, one of my signature projects have been hidden object games. I first did these monthly for Nature Friend Magazine as a freelance illustrator and my own full-color line of Can You Find? illustrations won several awards. But what goes in to creating a good hidden object puzzle? Here’s a little insight into the black-and-white version.
When I am illustrating a hidden object page, I am always thinking and planning out my strategy for my line work ahead of time before I even begin the final drawing. Should I use a stipple technique (tiny dots), vertical or horizontal line work, swirls shapes, thin or thick line weight? What will surround the object and how can I make the hidden object blend in with its surroundings?

There are certain areas in each illustration that are easy to see a place where an object can be hidden. The trunk of a tree and line work — all that texture — make great places to hide a paper clip, pencil, banana or, in this illustration, a clam shell.
In the mountains in the background of a landscape, depending on the object I want to hide, I will draw my line work in a specific direction to accommodate hidden objects. For instance, in the black-and-white illustration of the fox and the bunny rabbit, vertical lines were used to suggest rocks and mountains in the background. Using that line work to my advantage, I was able to hide a canoe and pliers.
The rocks in the foreground were an easy place to draw a hidden turtle. I changed the shape of the rock and added some texture to create a turtle-like shape. Or, I could have added some marks to the rock and, hidden among the dotted lines of grasses and the dirt in the ground, it can easily be turned into a slice of watermelon.
I think the more difficult place to hide an object is in the negative space of a drawing. An example of that in this illustration is the duck — hidden above the fox’s head — between his ears and among the tree branches.
I also think about the shape of an object and what shape may be similar to it when hiding an object. For instance, a daisy flower petal is long and slender, similar to a pencil, paper clip, banana or a spoon. Flower centers can become a strawberry or a blueberry.
Hopefully this will give you a small insight as to how I go about drawing up one of my Can You Find? illustrations.

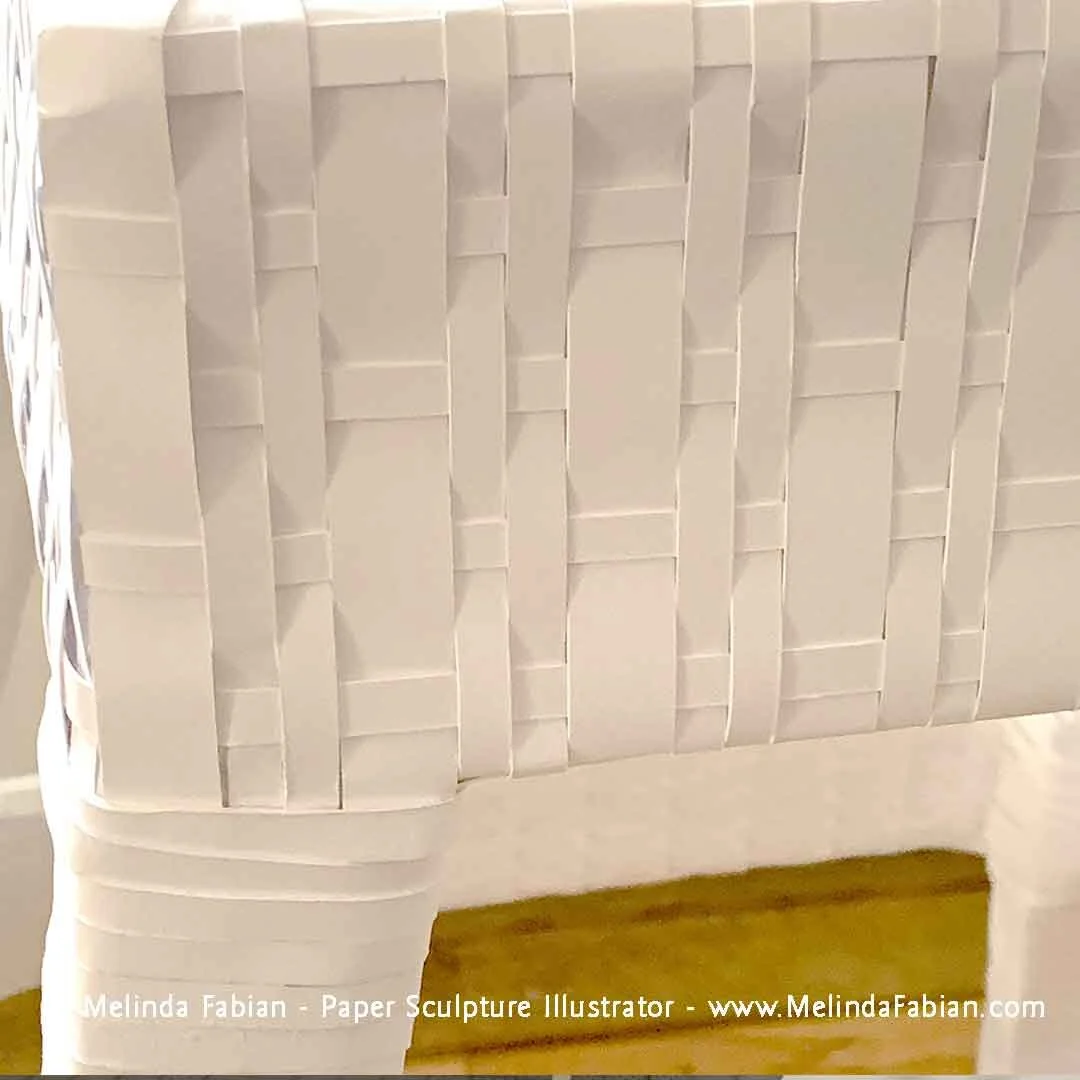
Adding a Wicker Table to Make a Paper Sculpture Set
It’s no good having a wicker chair without a table, so I also need a table to go along with my “wicker” chair (all made out of paper).
It’s no good having a wicker chair without a table, so I also need a table to go along with my “wicker” chair (all made out of paper). I’ve been working on the table simultaneously with the chair for my upcoming art installation, “Charming Victorian Country Garden Retreat,” at The Mansion at Strathmore in 2020.
For both the table and chair I used a cardboard base made by gluing together many layers to build a strong solid base, using many clamps to glue it together.

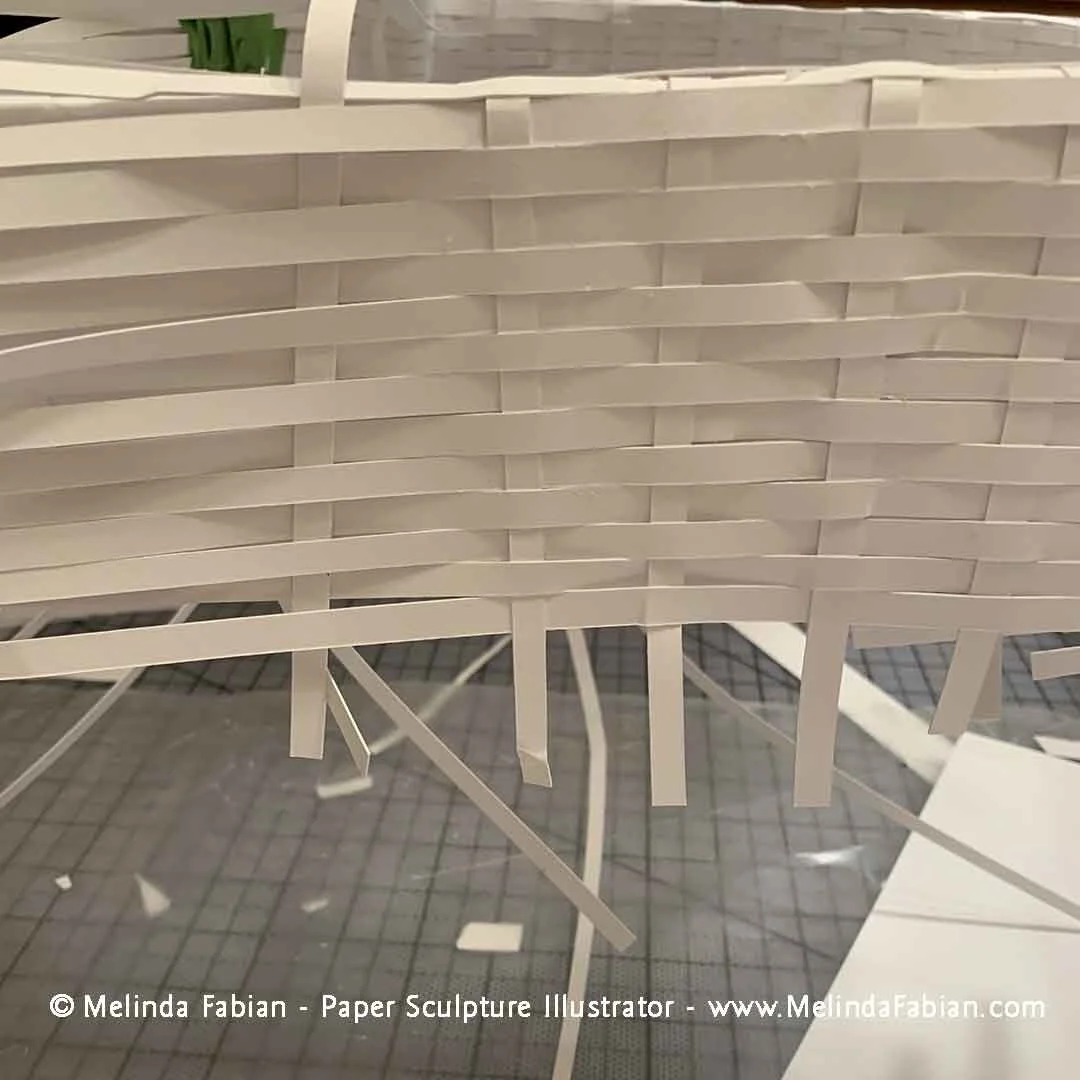
I posted several videos on social media to show how I cut out hundreds of narrow strips of Strathmore paper that I needed to make the table and chair.
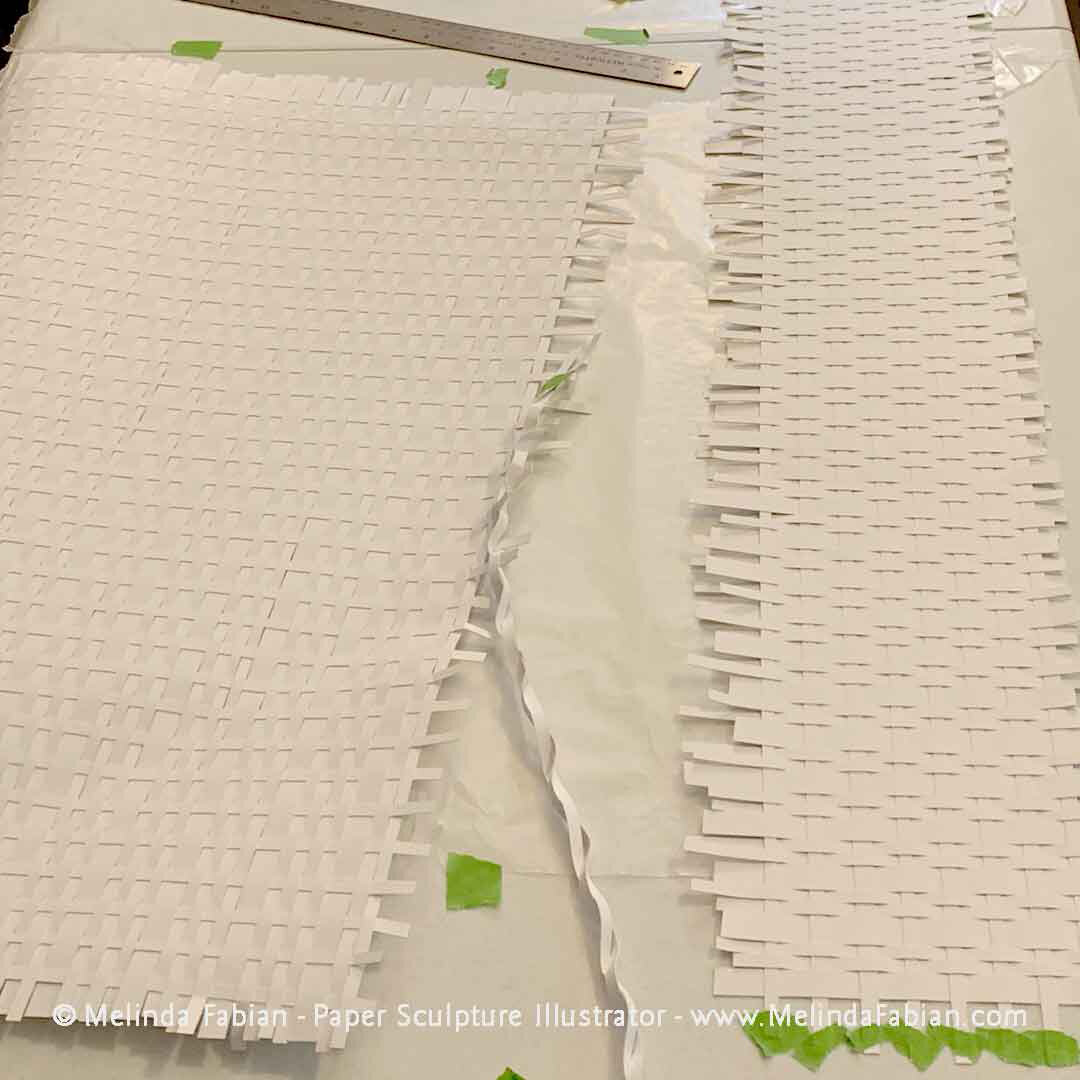
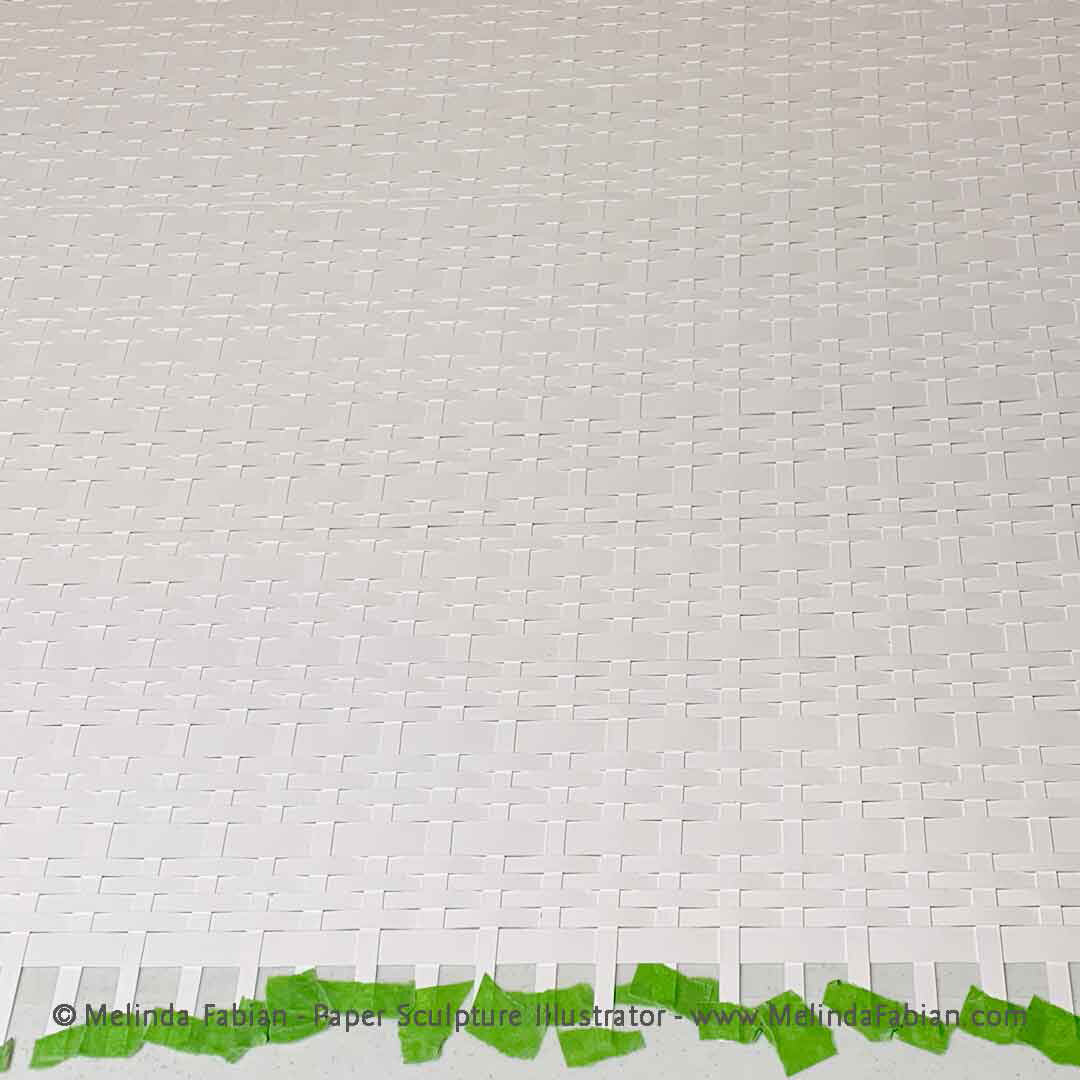

As you can see in this next photo taken during the weaving process on the chair, sometimes I really get into my work. It looks more confusing than it actually is in real life.

As I was designing my table and chair, I decided to incorporate some scroll work into the design. I want to give the furniture a little more elegant and Victorian flair. I went back to my good old quilling days — I started quilling as a teenager — to add some custom, white scrolls for the finishing touches.
Here are some final in progress photos as the table comes together: